This update to this most infrequently updated blog bears perhaps the most tangential of relationships to games, gaming, and the games industry, in that it’s mostly about cosplay. Specifically, about a costume I made – one that’s arguably more at home in cinema than games.
My fiancee recently had a birthday, and decided a party with the theme of 80’s sci-fi, action/adventure, and fantasy, in the realm of TV and movies, was the best way to enjoy said birthday. After much procrastination I decided I’d become The Predator, of “if it bleeds, we can kill it” fame.
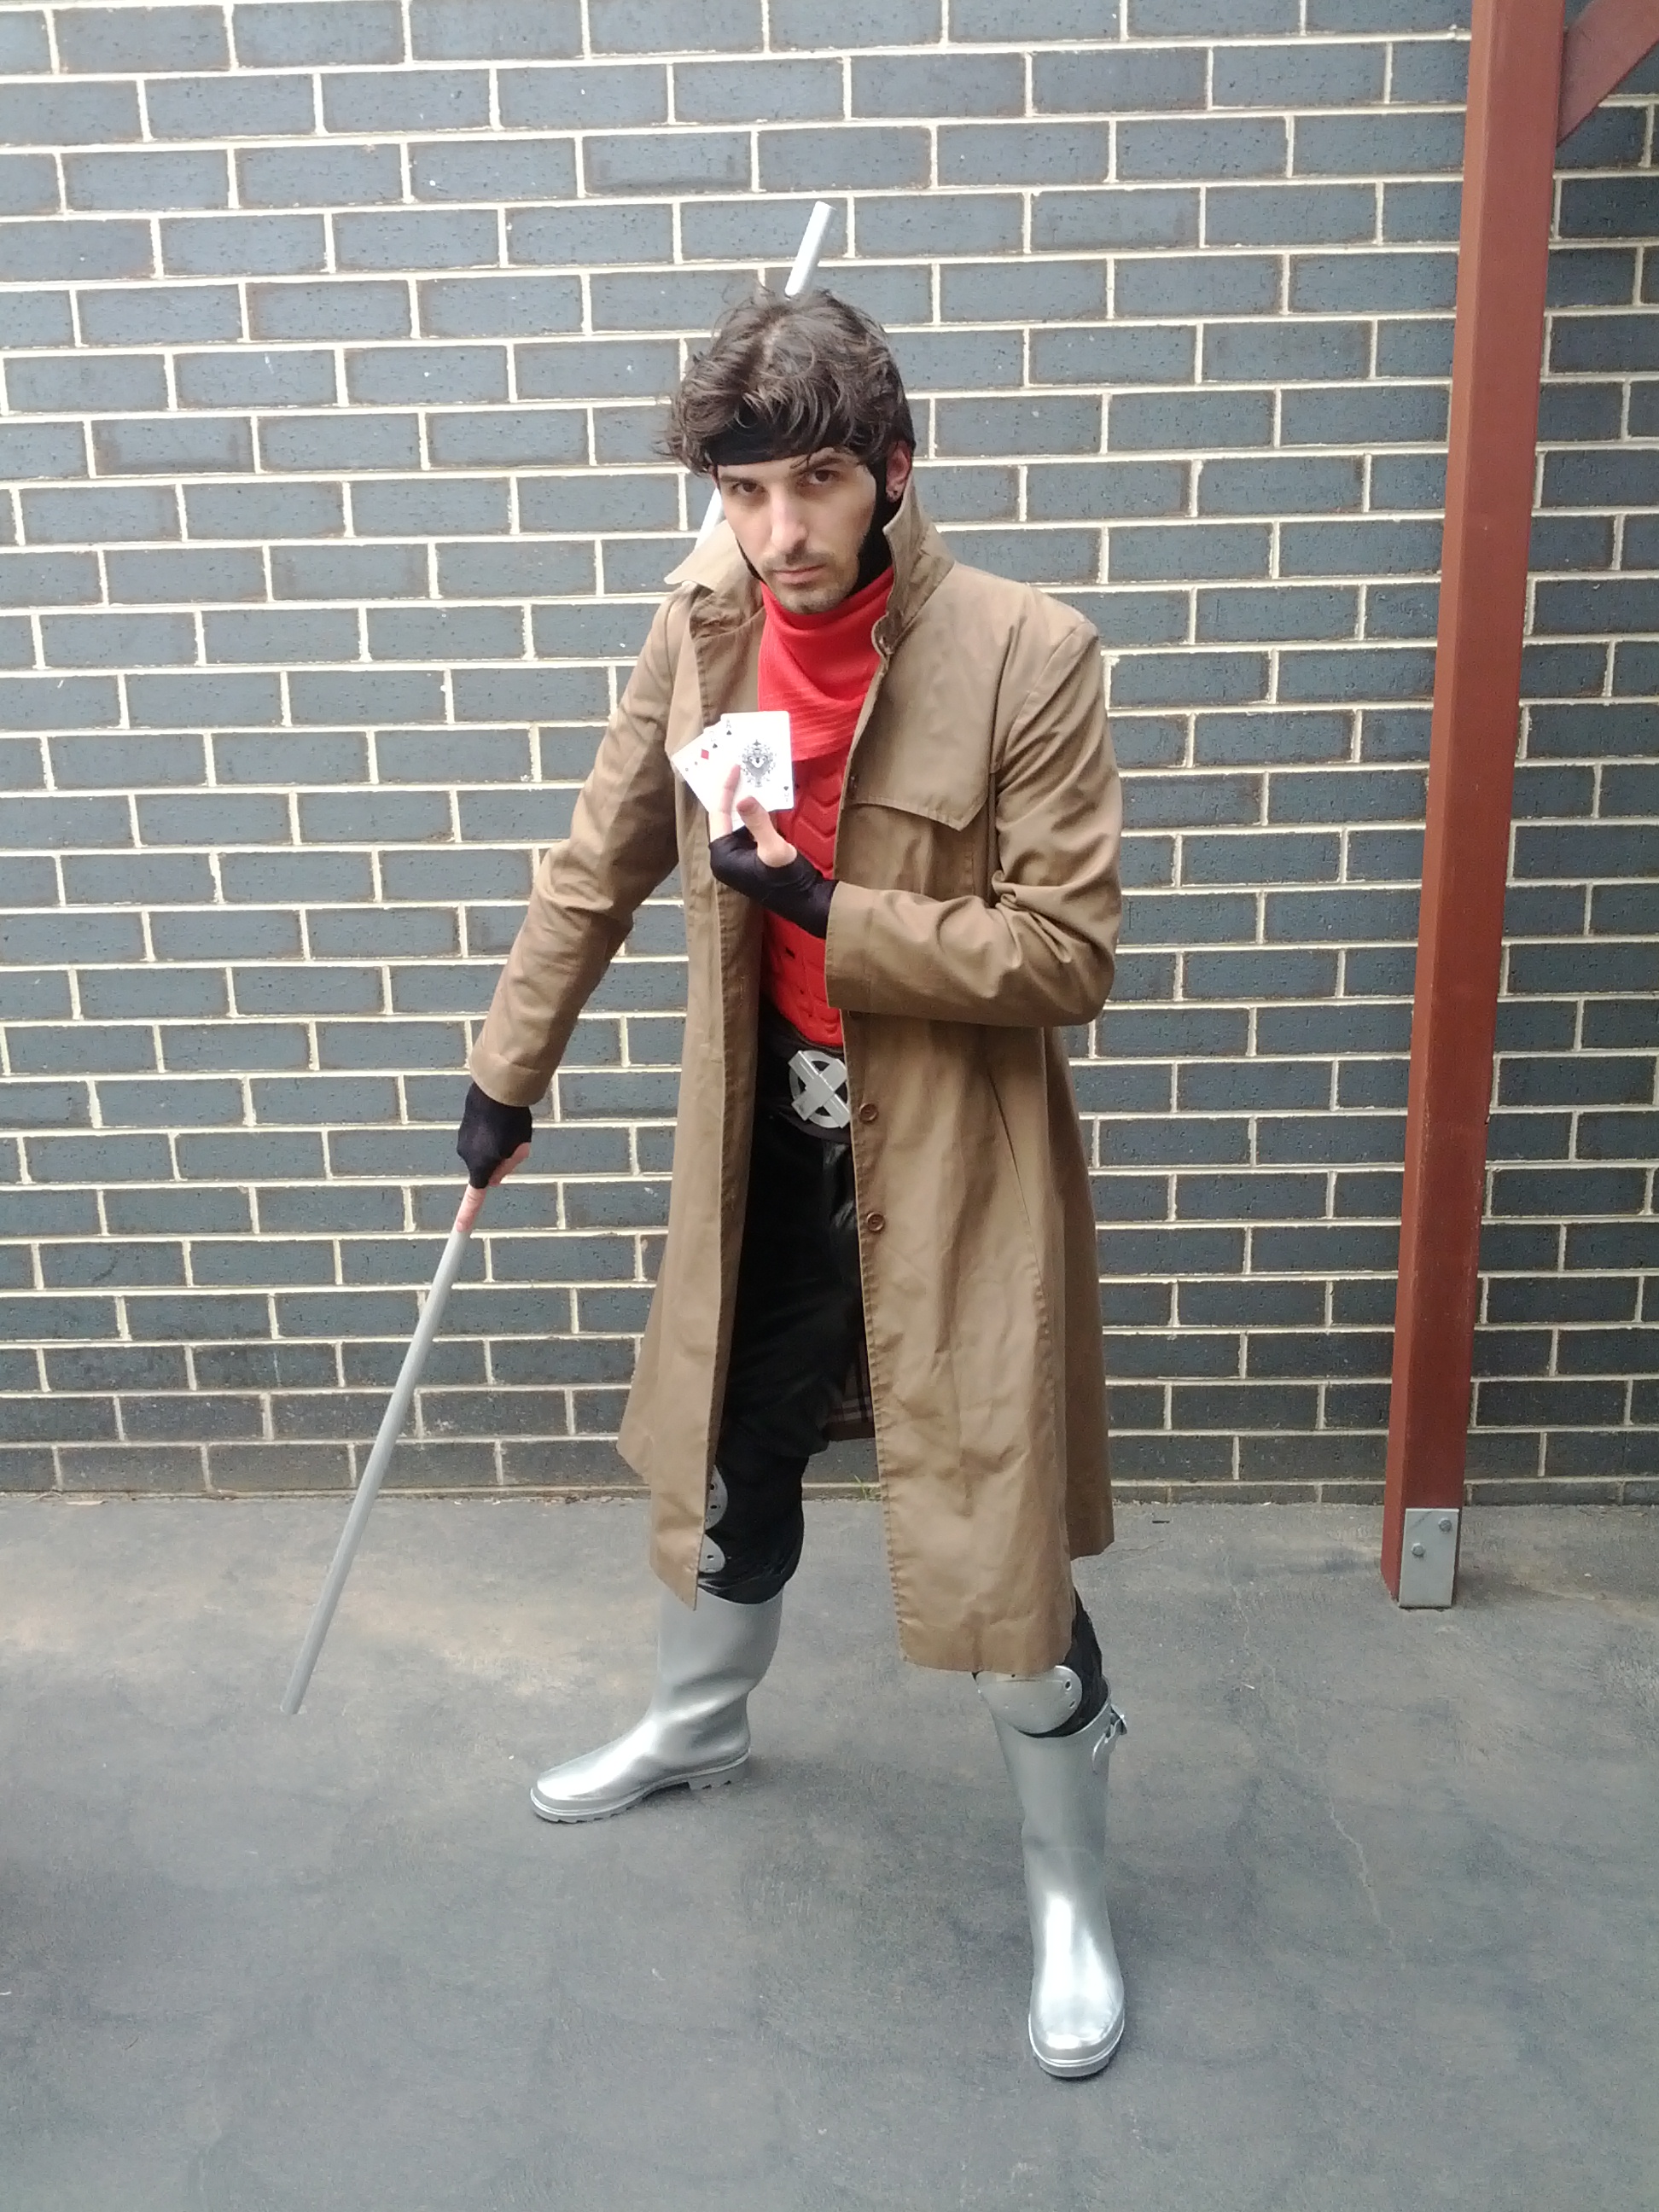
I learned that I enjoy the cosplay process, from design, to build, to wearing, when I decided to embody Gambit a couple of years ago for a friend’s birthday, and since some of you may also be interested, I thought I’d give you all a quick insight into how I went about it.

Me as Gambit – hey cherie
I really wanted to keep to a “as cheap as possible” budget, but you’ll find that some of the items in this costume are far from cheap – I happened to already own them so you may need to find substitutions.
Stompy Boots
One of the easiest elements for me, was this pair of New Rock boots. New, they were $280, but I’ve had them over a decade, so for me, $0. Purists may note that Predator doesn’t wear boots like this. Generally he has bare-ish feet, sometimes sandals, sometimes sandals with spiky blades jutting forward. I honestly couldn’t be bothered with making feet/shoes, so these black/silver industrial metal boots from the school of near-enough-is-good-enough were just the ticket.
![IMG_20140705_182538[1]](https://accurateobservation.com/wp-content/uploads/2014/07/img_20140705_1825381.jpg?w=497&h=367)
Cost: $0-280
Effort: 0
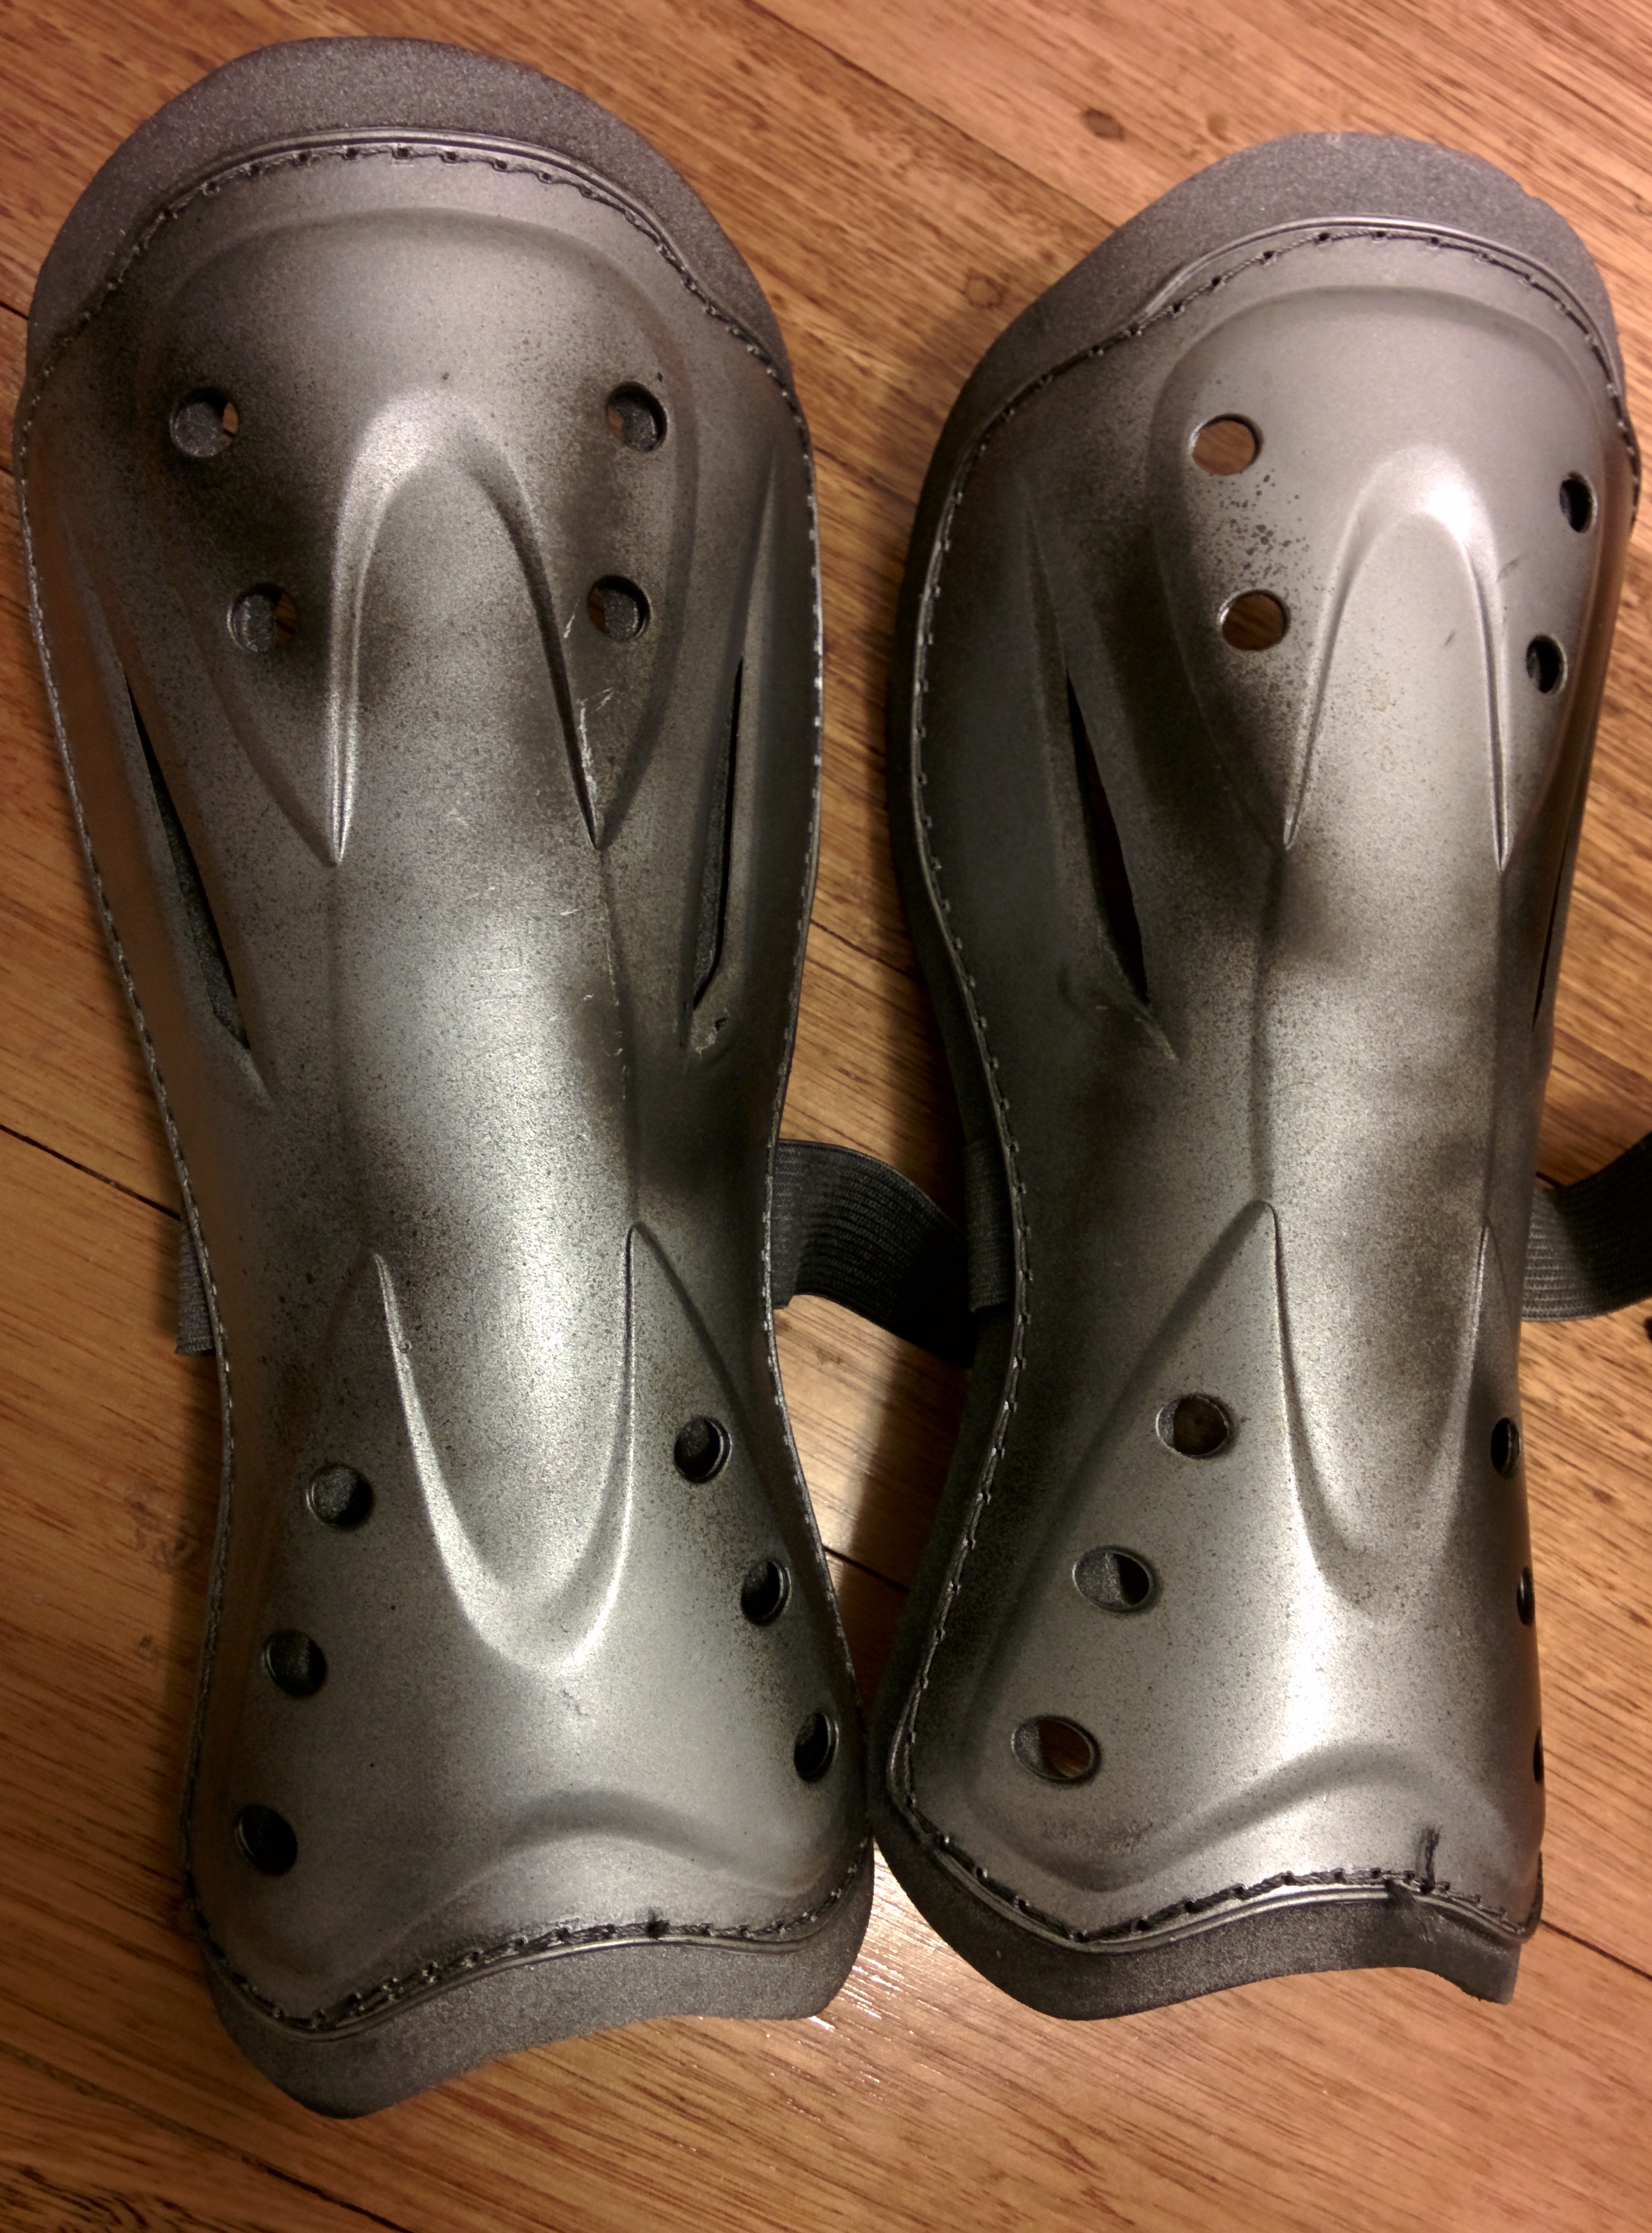
Shin City
Predator has some fairly chunky shin armour, and lacking knee-high boots, I decided some soccer (football) shin guards would give the desired effect here. I thought about extending them with cardboard to cover the knees, but in practicality, that wouldn’t have worked easily, and probably wouldn’t have looked very good if I’d done it in a complex manner.
I picked the shin guards up, second hand, from Savers, and a few coats of paint later…

GOOOOAAAAALLLL
Cost: $5
Effort: 15 minutes painting, a couple of days drying.
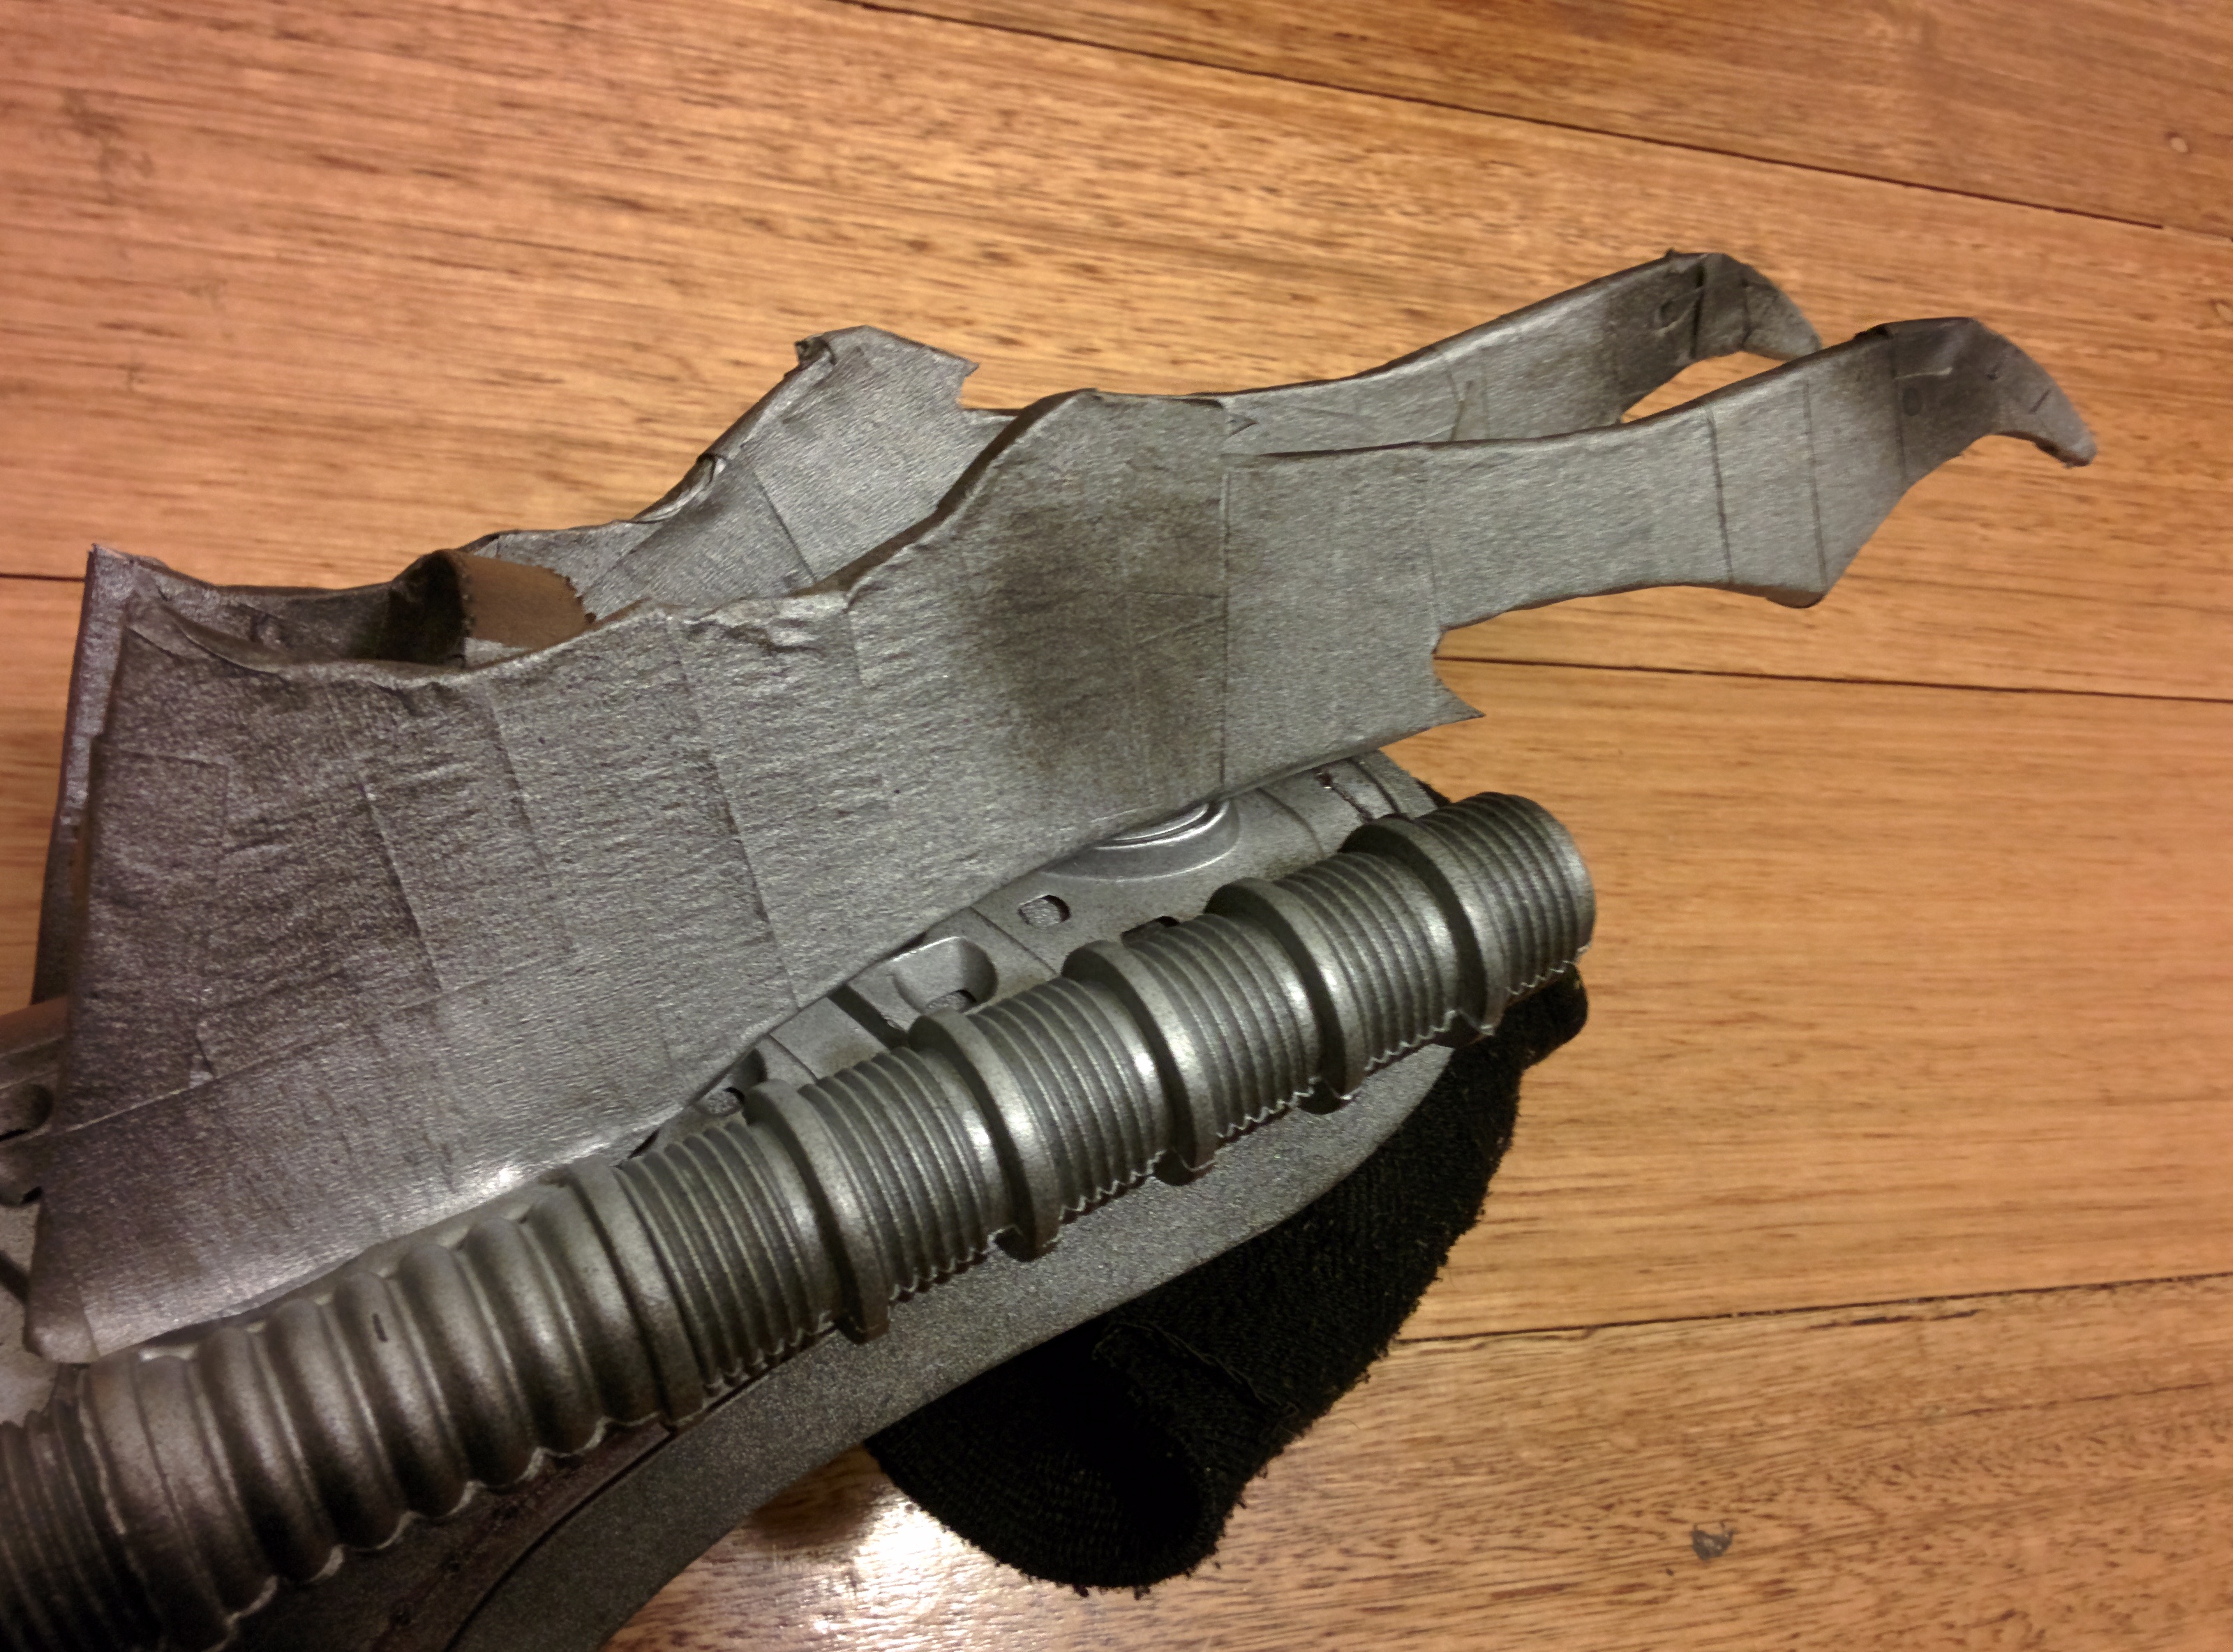
Wrist Blades and Computer
I’m fairly proud of these. The base for each is another pair of shin guards I picked up from Savers ($5). On each side I glued a piece of PVC pipe I bought from Bunnings ($2.50). The detail on the pipe is all default design. I have no idea what they are used for in the real world, but once you start looking at costume builds it’s amazing what “everyday” objects can become in the right setting. The rest of the wrist blade was thin cardboard, given stability with some packing foam from an SSD box cut to the same shape, then wrapped with masking tape and spray-painted.

Stabbylicious
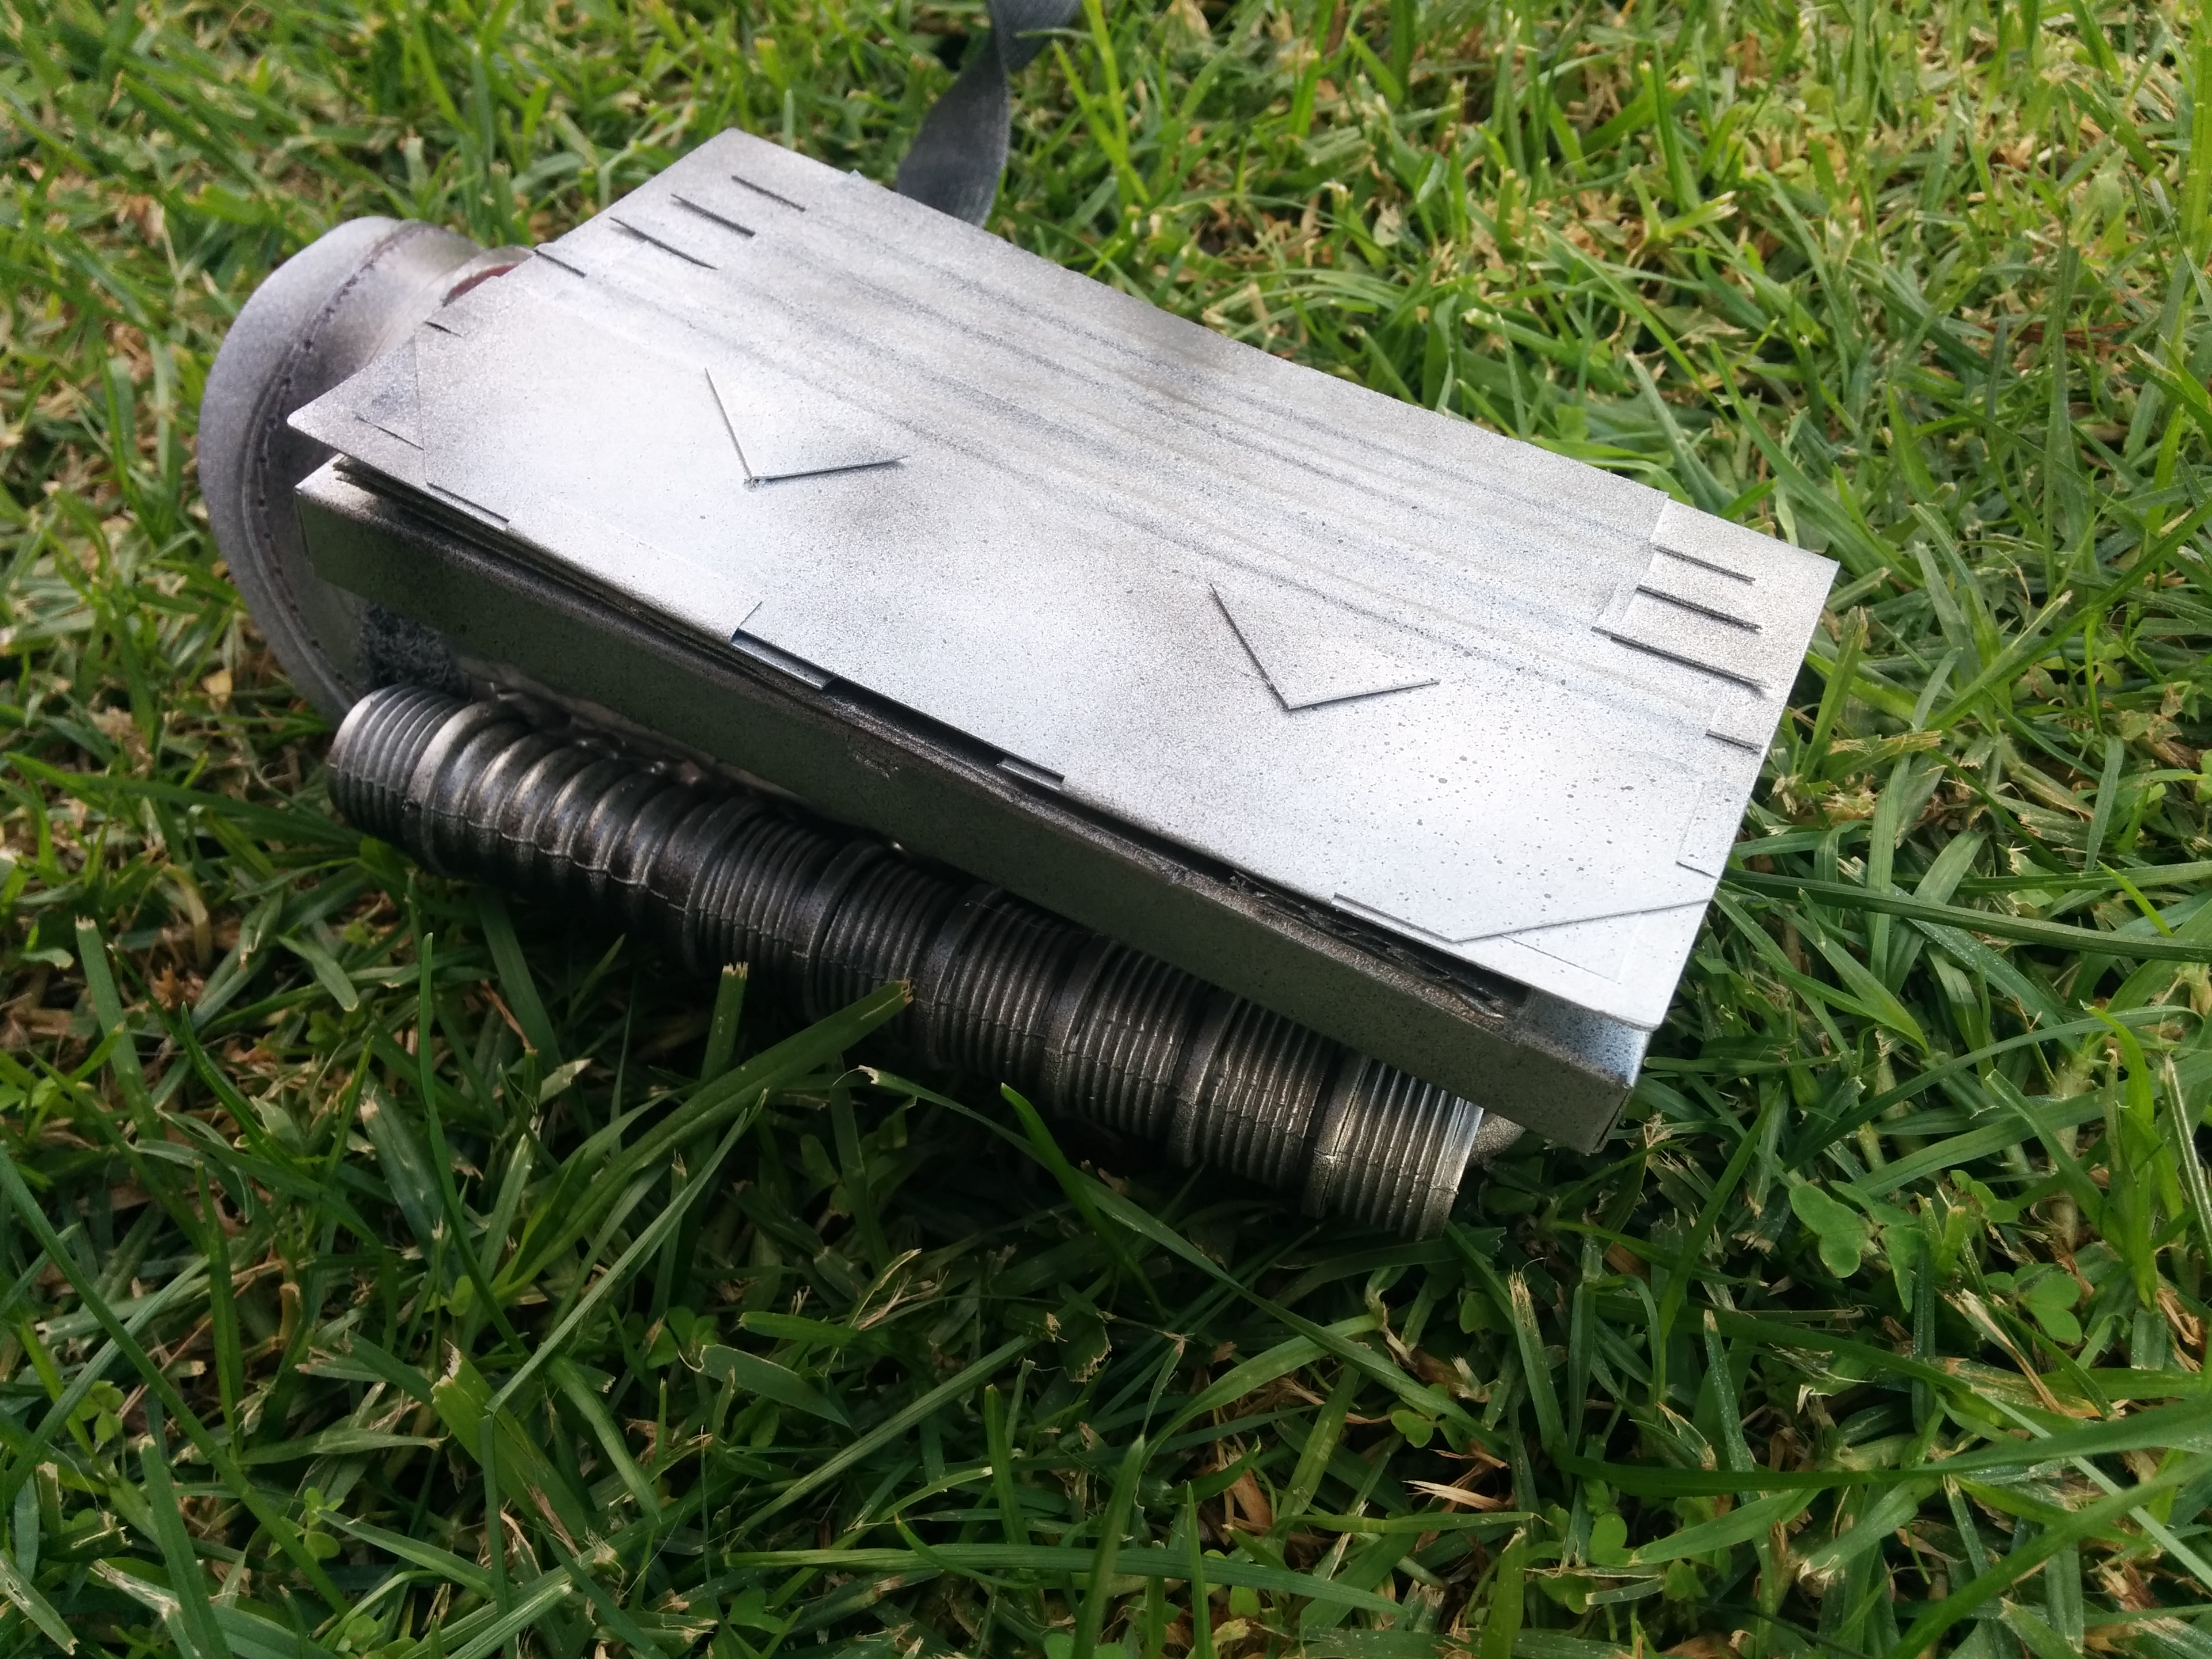
For the wrist computer I had an idea, which I spoke out loud: wouldn’t it be cool if there was a phone app that looked like Pred’s computer, and you could press it to produce Predator sounds – like a Predator soundboard. I had grand visions of hiding a Bluetooth speaker in my helmet, and initiating the iconic click-clack of mandibles from the app.
I then promptly forgot about this idea and built a wrist computer facsimile which was okay, but nothing special. My fiancee then piped up – “what about that app?” Oh shit. I immediately went to the Play Store and found a predator clock app. No soundboard, and it didn’t have a timer/countdown feature, but it would do.
To house my phone, I used the packaging it came in – a perfectly cut resting place. I had to redo the window overlay, and make a new top lid, for which I used other parts of the phone packaging. The thin cardboard and masking tape made for surprisingly good detail – though not as elaborate as images I found online, it was again, “good enough”. I secured the lid with a black twisty-tie, barely visible. The hinges are simply masking tape. I could have made these a bit better, but… time was running out.

Accidental Weyland logo on the top, I swear.
Cost: $7.50 (not including my Nexus 5) – $430
Effort: About 3 hours of designing, cutting, gluing, masking, and painting. A couple of days total drying time.
Gloves
Predator has gloves. They don’t look exactly like this, but they are fingerless, and this was easy. A few bucks from Arthur Daley and no further effort.

Billie Jean is not my lover
Cost: $5
Effort: 0
Cod-piece
It turned out this was annoying to wear, especially bending/squatting, and over the course of the evening it was starting to come apart. You don’t realise how often you do things like bend down to get something until your restricted when you try to do it. Anywho, lesson learned – I’ll make the next one less wide, if ever I do this again. There’s no big secret here, it’s just cardboard, cut to shape, masked, then glued together, spray painted and then finally glued to the back of a cheap “leather” belt (buckled at my back) which I already had lying around.
![IMG_20140518_144901[1]](https://accurateobservation.com/wp-content/uploads/2014/07/img_20140518_1449011.jpg?w=497&h=662)
Cost: $0-10
Effort: Relatively easy. About an hour.
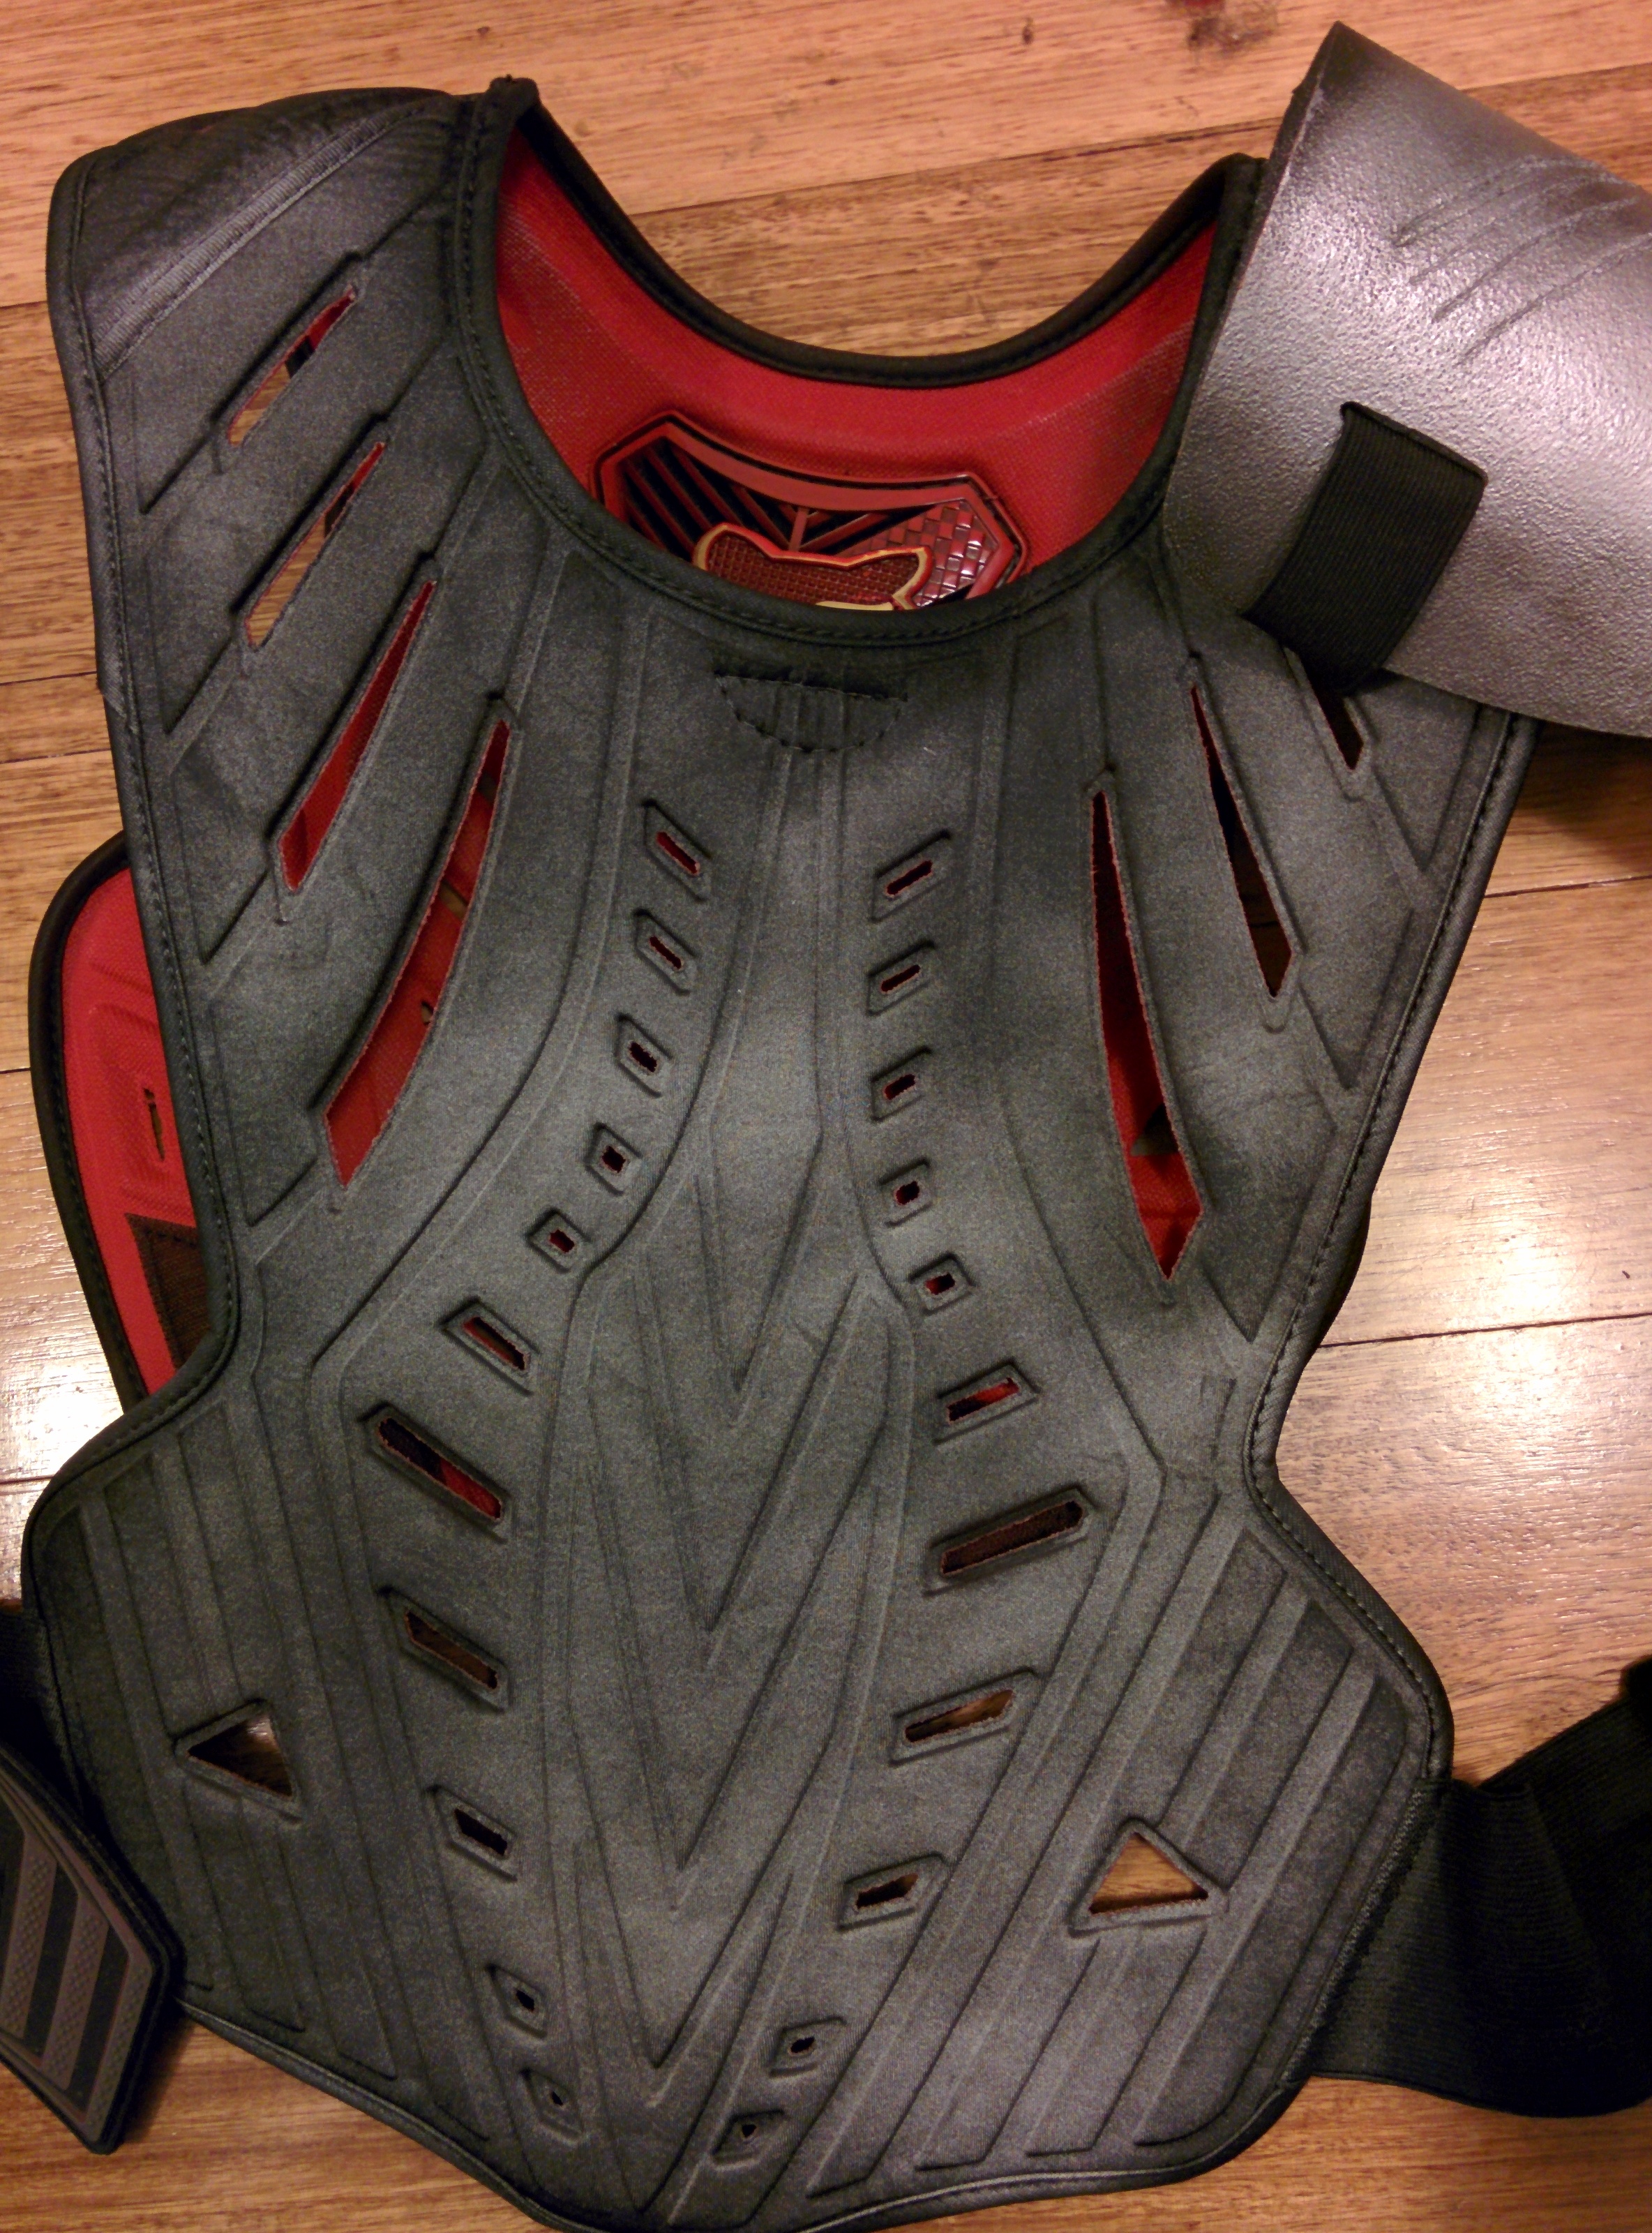
Chest Armour
This is actually a motorcross chest guard, which I already had from when I was Gambit. It was originally black, and with one side painted red, I simply flipped it over and applied some silver to the black underside. To buy this new, you’re looking at about $80 from a retail store.

Look at the Gambit pic waaay above. Same thing, different side.
Cost: $0-80
Effort: 10 minutes painting, couple of days drying.
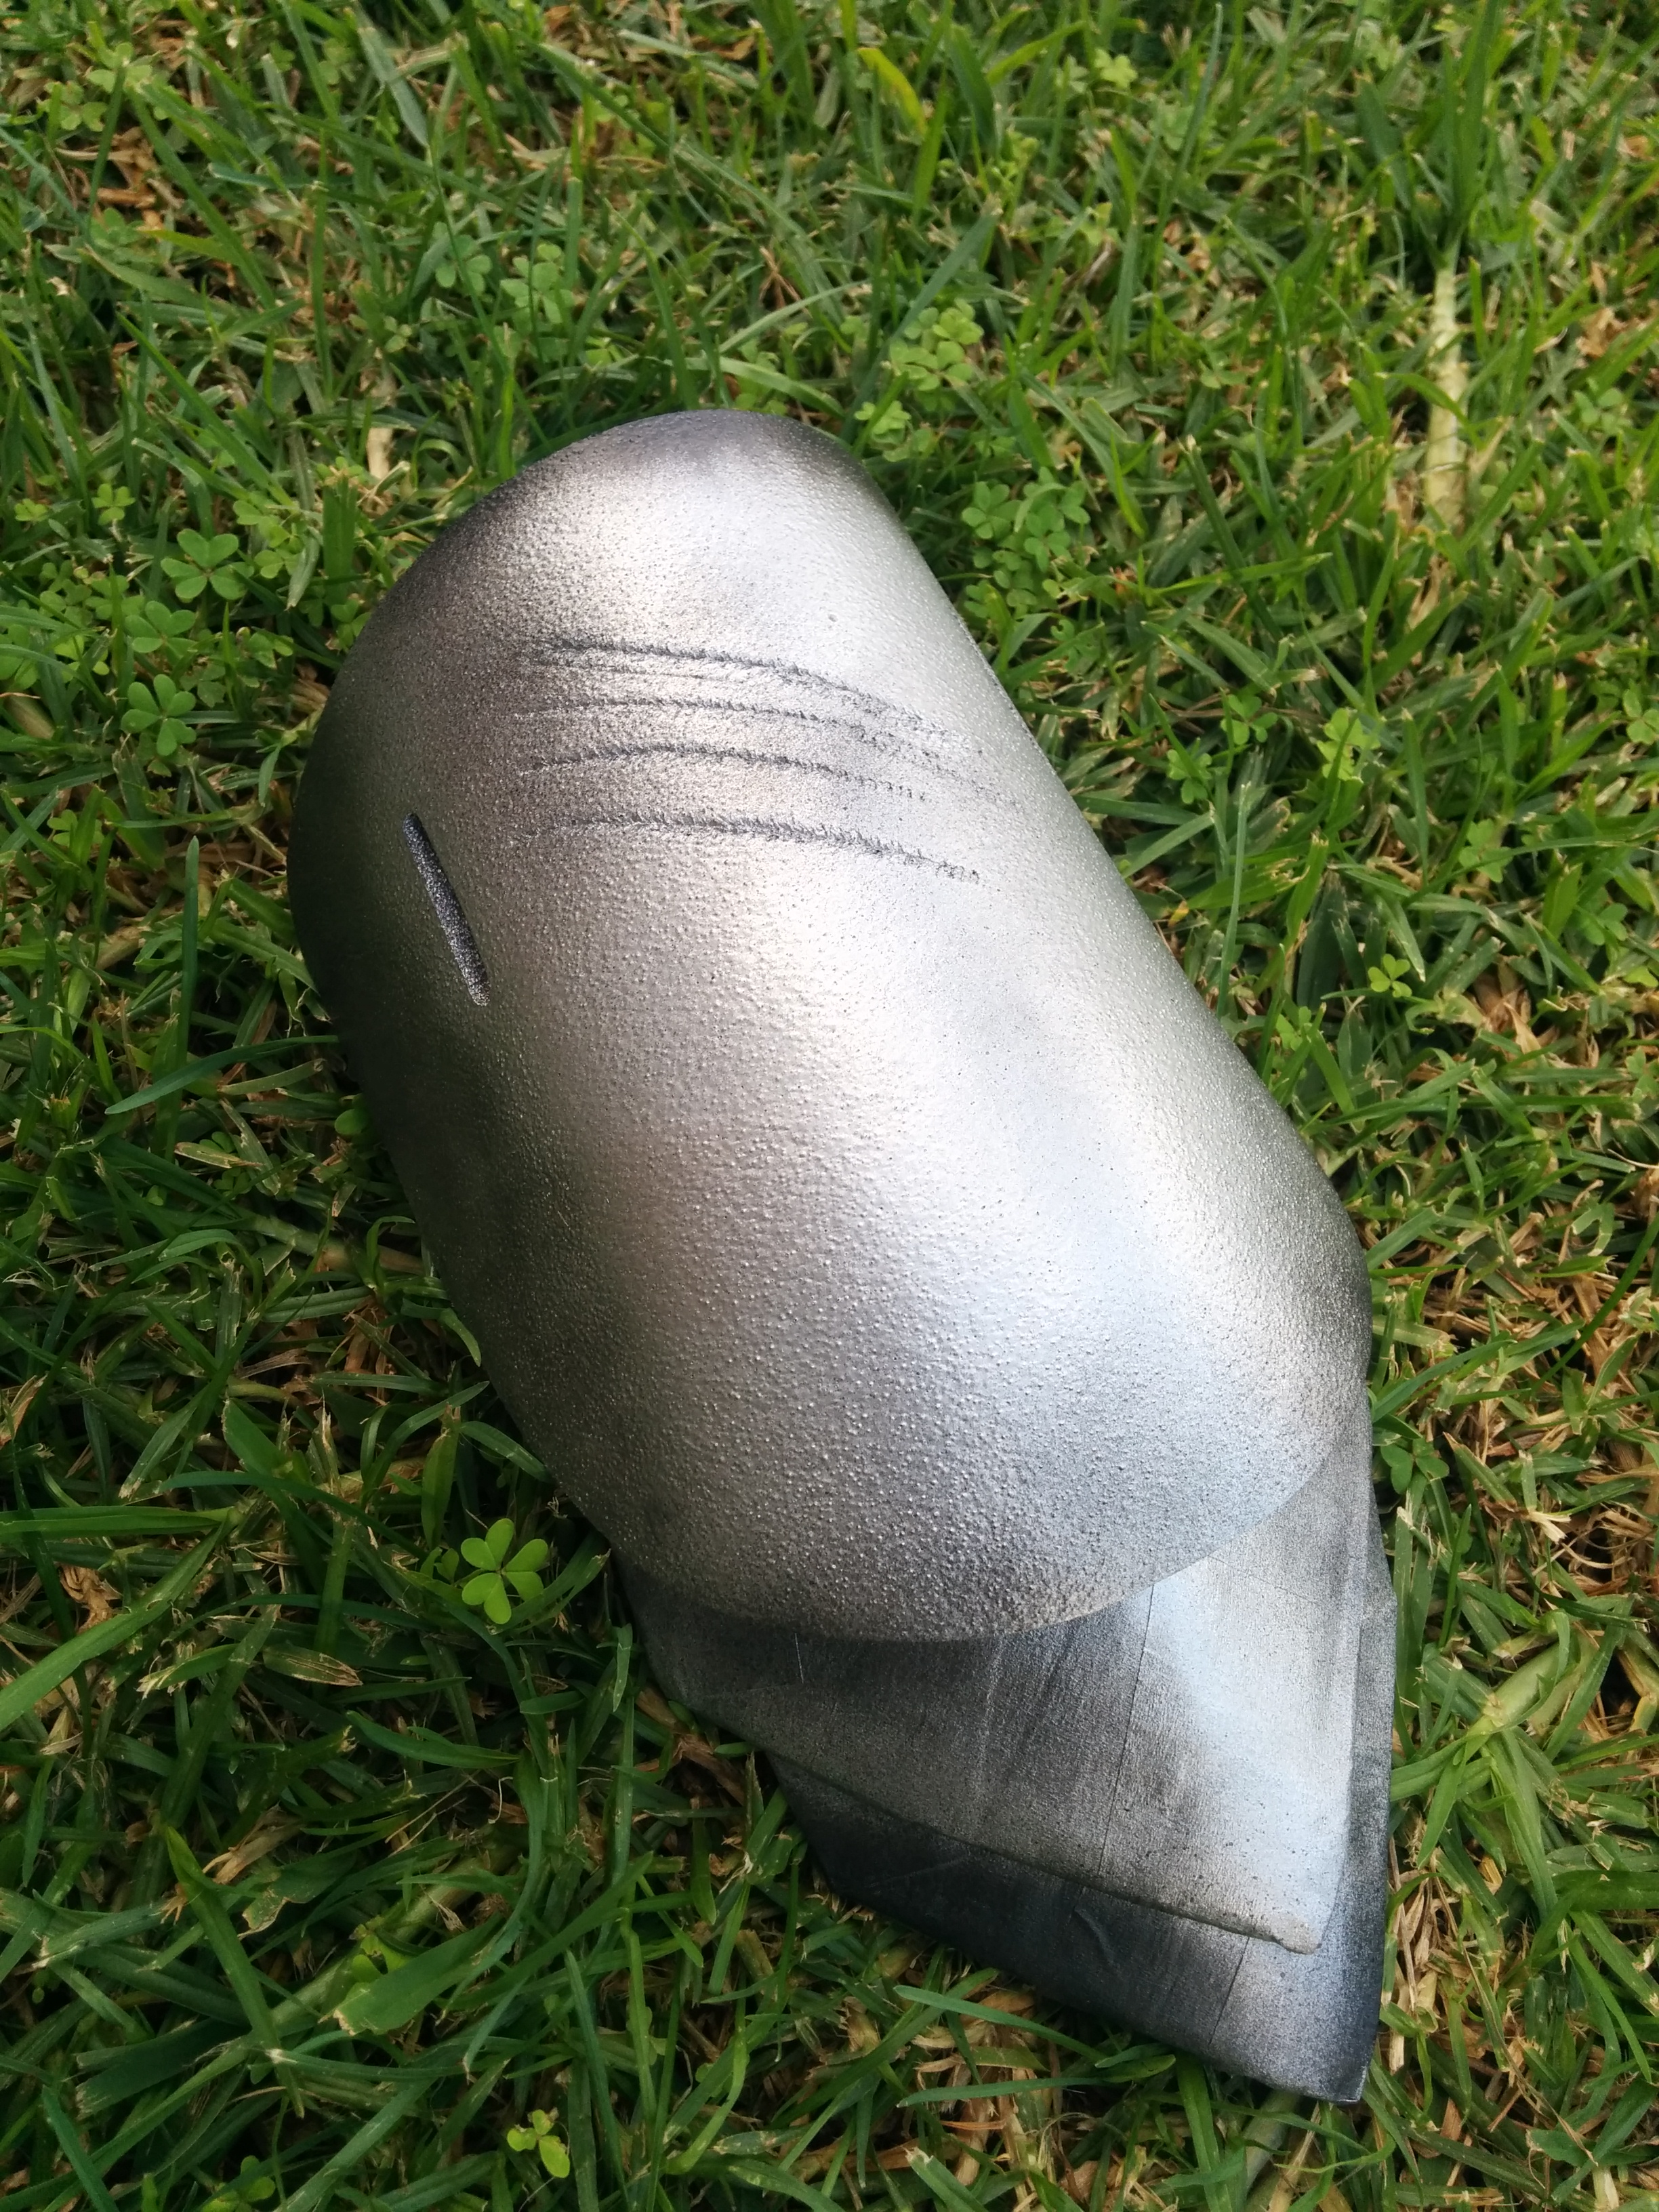
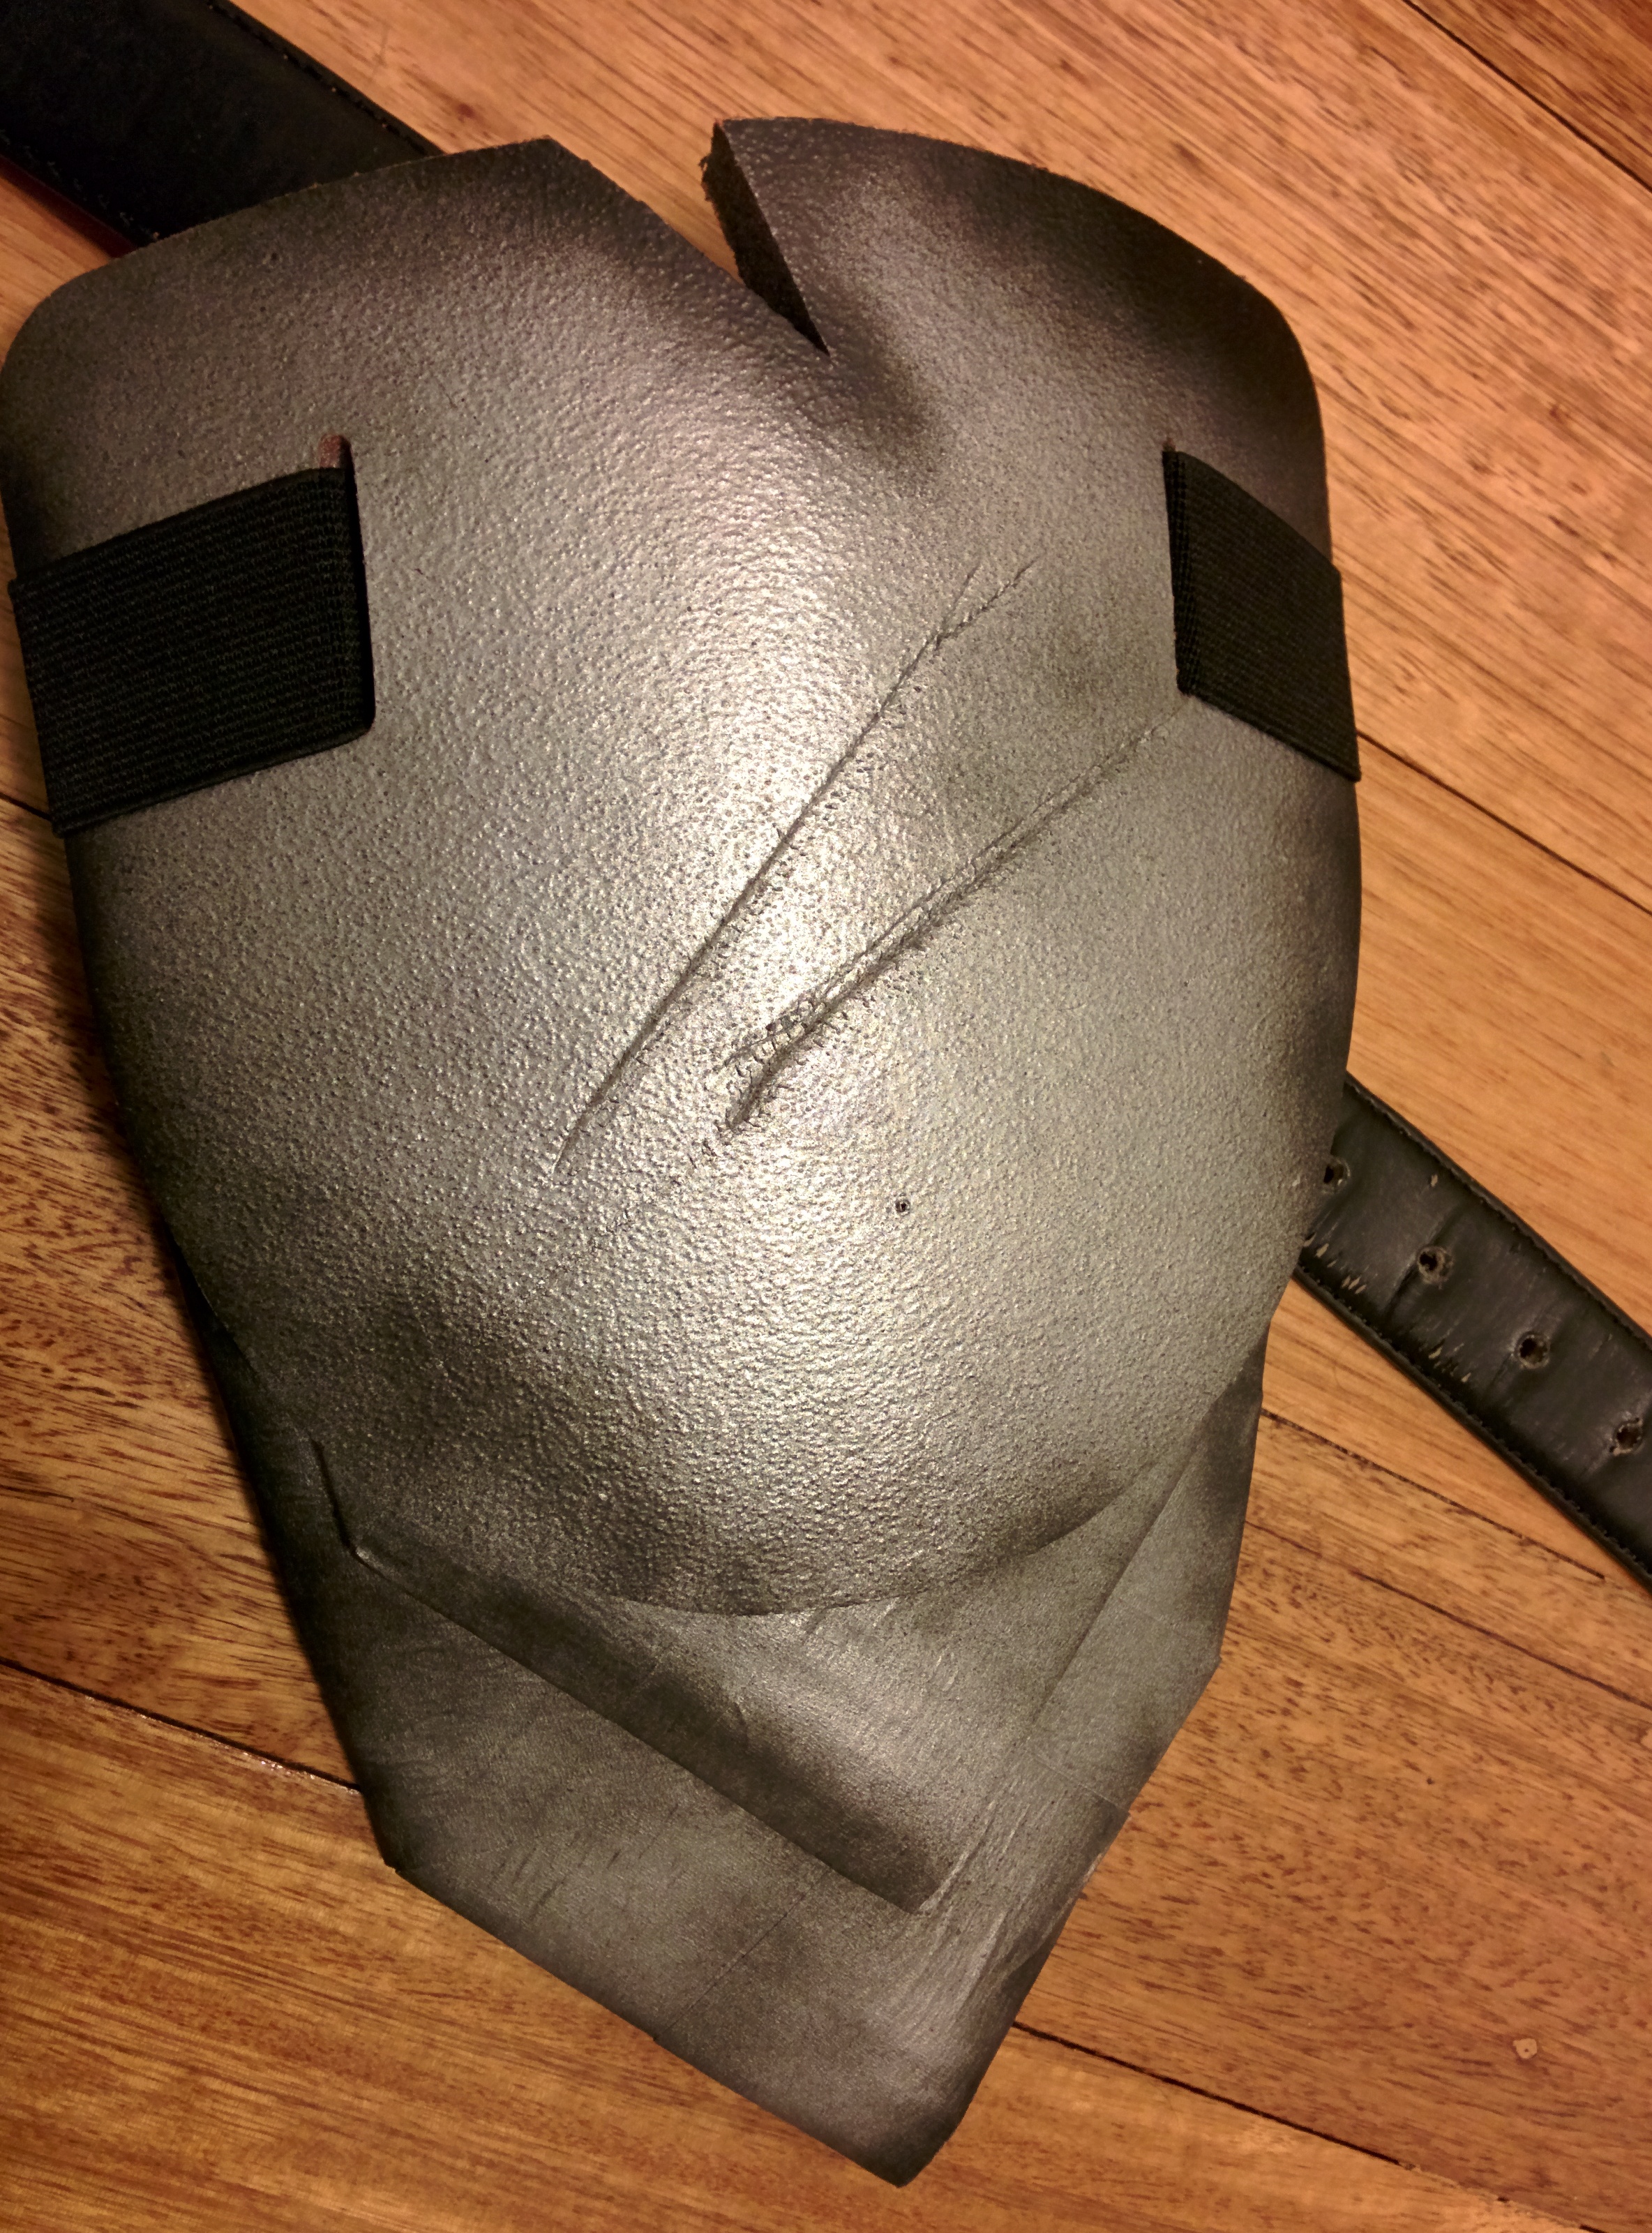
Thigh Guard and Pauldron
The base in each of these was a pair of thick foam workmans kneepads (designed for people who are on their knees, tiling, gardening, whatever), and the additional… leaves?… are masking-tape-wrapped cardboard, glued on underneath. I used a heavy-duty stanley knife to cut a “chip” in the thigh guard, and used the back of the blade to score battle-scars into both. I found the foam soaked up a LOT of paint, and took a long time to dry. The included elastic/velcro straps made them easy to attach to the belt and shoulder of the chest piece respectively.

A burden to shoulder

The thigh’s the limit
Cost: $15
Effort: 1.5 hours, a few days drying.
Helmet
Easily my favourite part of the costume, but the most complex and time consuming. Luckily there are a range of options for a range of budgets. I used a motorbike helmet as a base, and this cost me nothing because I had it spare, and I used the images in this post as a guide as to how to go about it. You can actually buy professional, legal, protective motorbike Predator helmets, and they look awesome, but you’re also looking at $800+. This guy made one from scratch, using cardboard, so if you can’t (or don’t want to) pick up a cheap helmet second hand, this is your guide.
So as you can see in the the other guide I found, it’s the original helmet, masking tape, cardboard, and for the jaw/brow ridges I used the thicker foam in the SSD packaging I had.
![IMG_20140517_213911[1]](https://accurateobservation.com/wp-content/uploads/2014/07/img_20140517_2139111.jpg?w=497&h=662)
![IMG_20140517_220416[1]](https://accurateobservation.com/wp-content/uploads/2014/07/img_20140517_2204161.jpg?w=497&h=662)
![IMG_20140517_233913[1]](https://accurateobservation.com/wp-content/uploads/2014/07/img_20140517_2339131.jpg?w=497&h=662)
![IMG_20140517_233926[1]](https://accurateobservation.com/wp-content/uploads/2014/07/img_20140517_2339261.jpg?w=497&h=662)
![IMG_20140518_024913[1]](https://accurateobservation.com/wp-content/uploads/2014/07/img_20140518_0249131.jpg?w=497&h=372)
![IMG_20140518_024933[1]](https://accurateobservation.com/wp-content/uploads/2014/07/img_20140518_0249331.jpg?w=497&h=662)
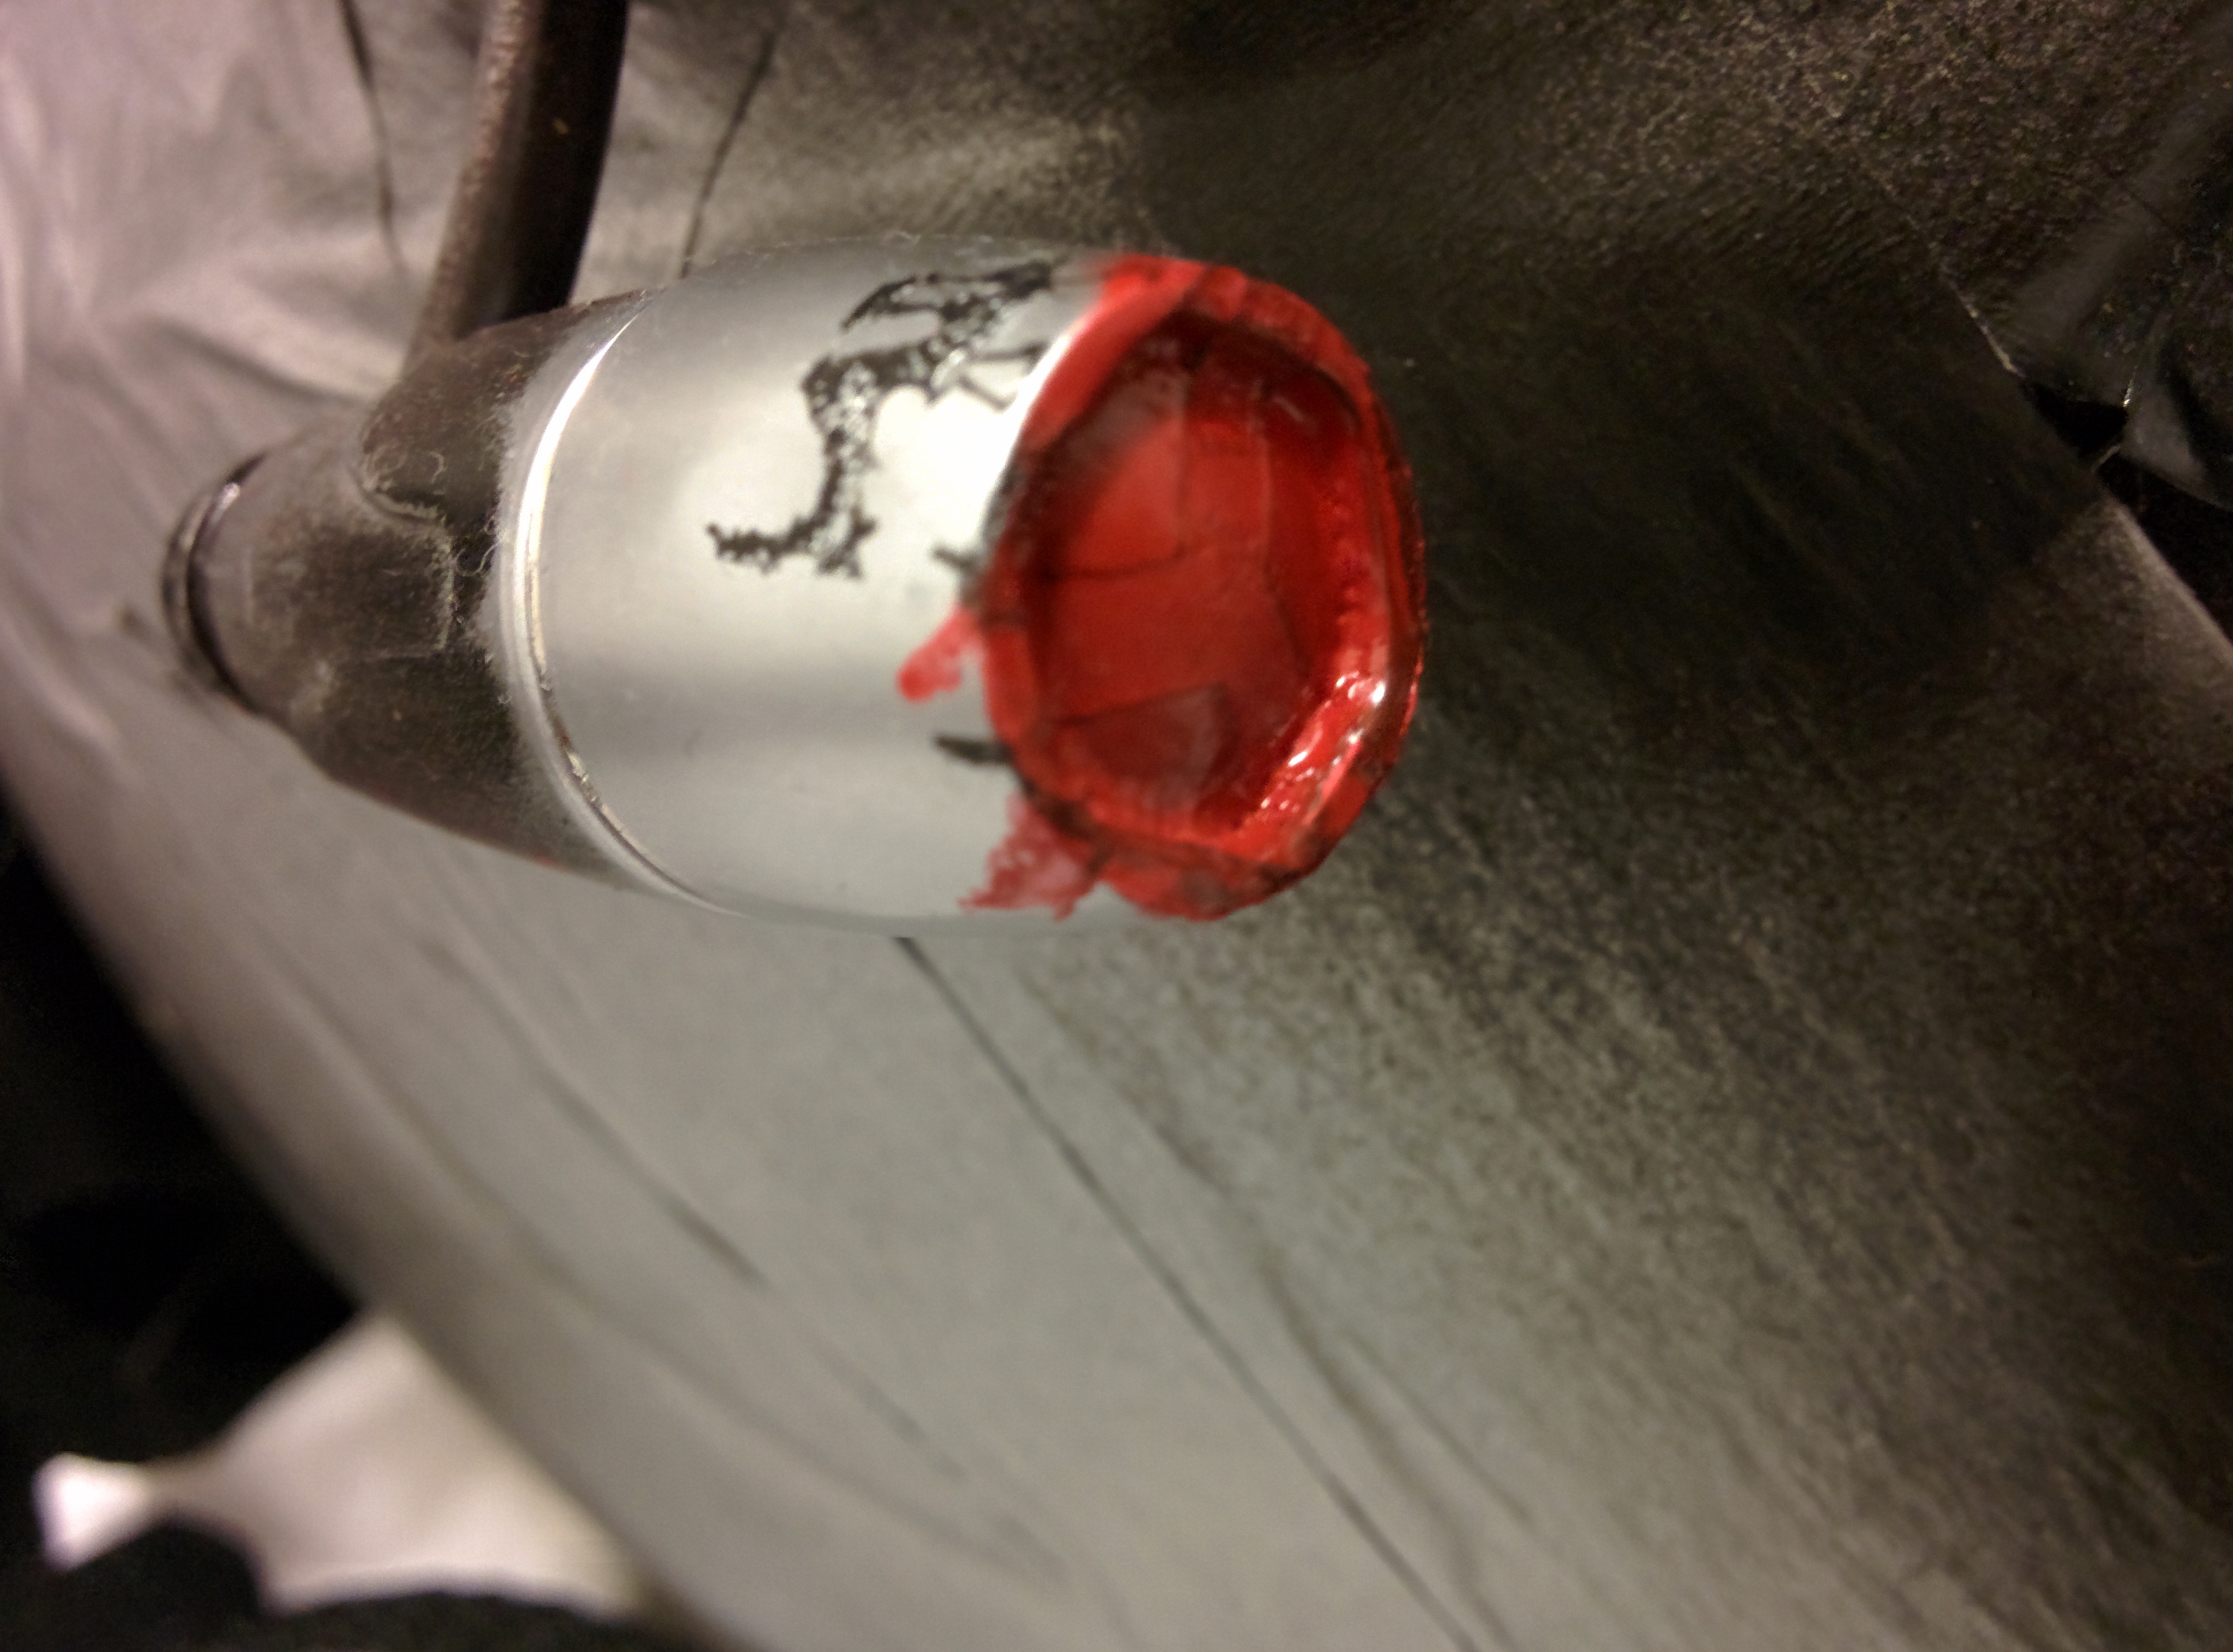
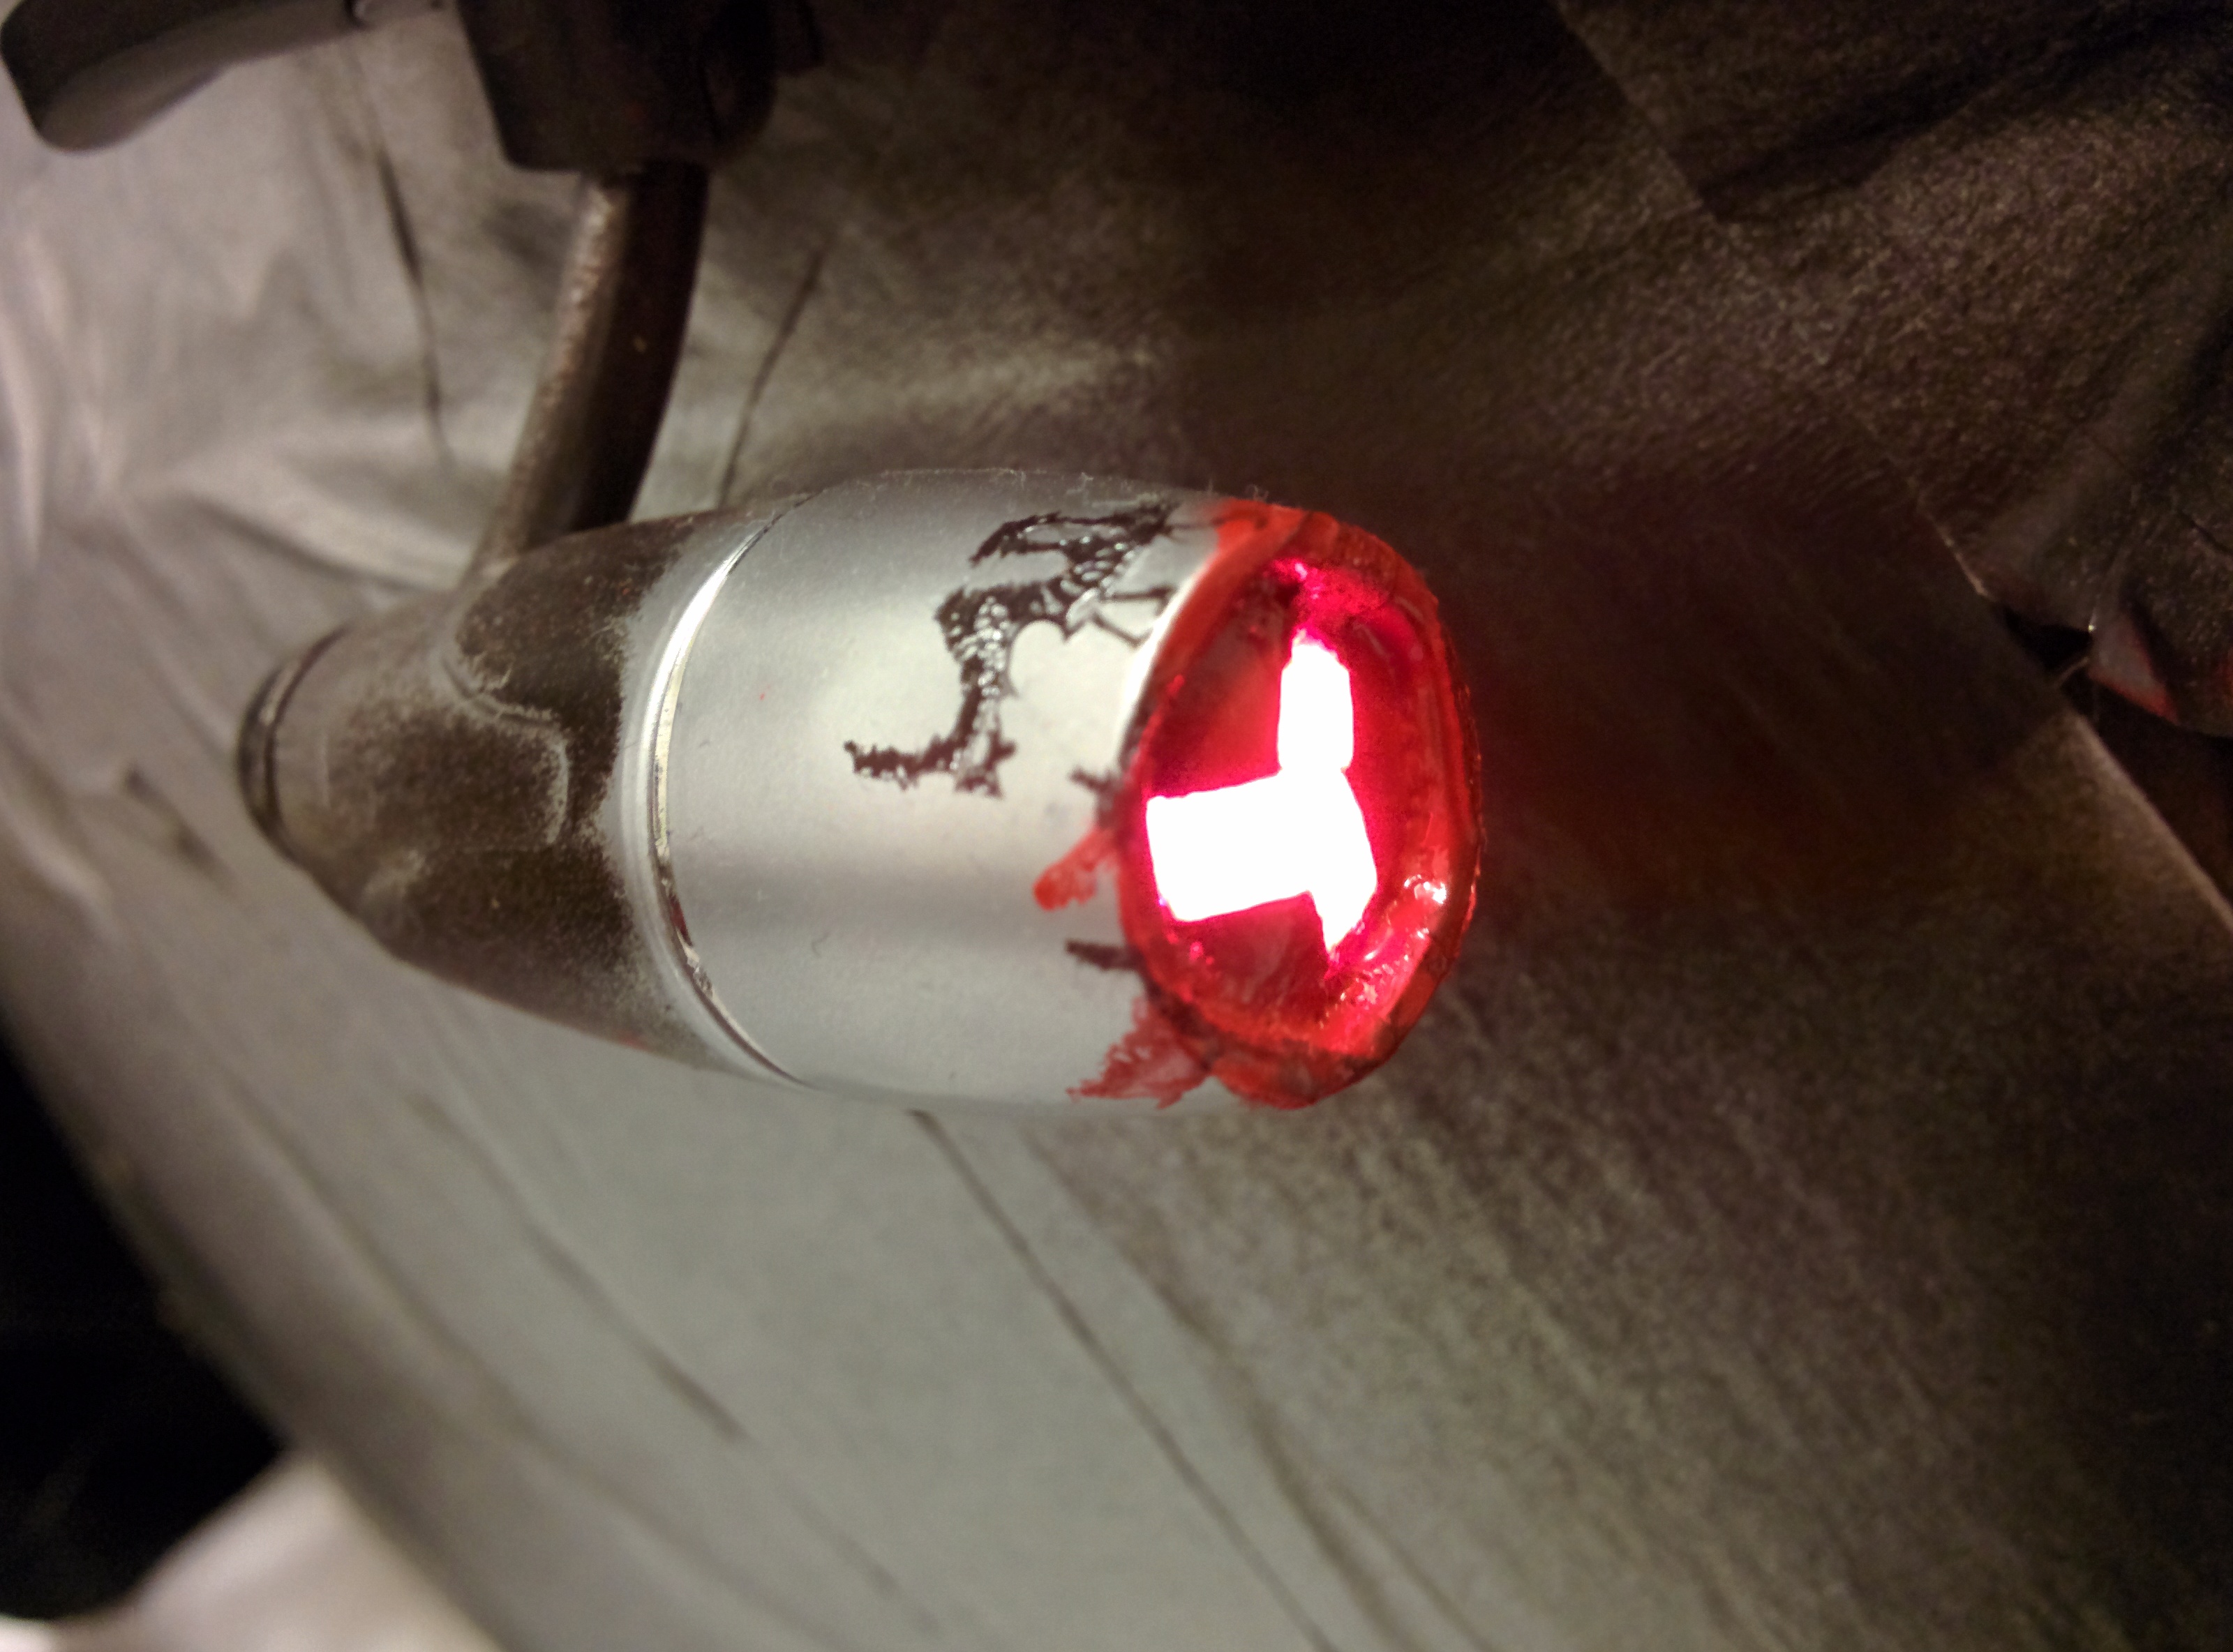
The laser is something I built myself. I originally bought a book light from K-Mart ($10) and was intending for it to be a humorous shoulder-cannon (obviously way too small), but then I had a great idea – what if I turned it into a laser-sight? I had been unable to find a laser pointer anywhere, and decided this would fit the bill.
Some thin strips of painters tape to form an upside-down mercedes-style symbol, taped up the edges, and then spray painted the face of the light black. Paint did NOT want to stick to the surface of the clear light cover, and it took… I don’t know, like, 10 coats, with drying time in between each to black it out satisfactorily. I then removed the tape and was left a beautiful tri-mark of clear plastic the light shone through. Now I could have maybe masked with painters tape over the black, but I was out of time and also worried the tape would pull the paint off given how much it didn’t want to stick in the first place. So I just painted the whole face red. It took three or four coats to make it sufficiently red – the first few being a little too pink when I turned the light on. I was also conscious of not coating it to the point NO light would come though. I wanted a red glow. That done, I simply glued the light on to the helmet (which by this point was otherwise complete).

Terrible paint job, but…

…effective
Now, the dreads. God I love the Predator’s dreads, but short of a visit to Clark Rubber, I wasn’t able to find rubber/plastic hosing that looked, felt, or moved right. In the end, I bought a length (10m I think it was) of black rope ($15), made of some synthetic material. Then I estimated a length, and cut. I used a cigarette lighter – which I had from years ago when a friend decided to quit smoking and gave me all his lighters to make it more difficult for him to light up (I don’t smoke) – to melt/fuse the ends of the cut lengths to stop them fraying. I then glued them one-by-one to the back-underside of the helmet rim.
It was enough for a couple of layers. Purists again may note the predator has rings/beads in his dreads, but I couldn’t find anything suitable and decided it was too much work.
The one thing I REALLY wanted to do but did not have time for, was make the helmet smoother. There were two options I evaluated – fibreglass, and bog (bondo). Both of these would have taken way too long, but if you look at the result in the tutorials I’ve already linked, you’ll see they look amazing. I’d consider redoing the helmet with one of these if I were planning to wear this costume again.

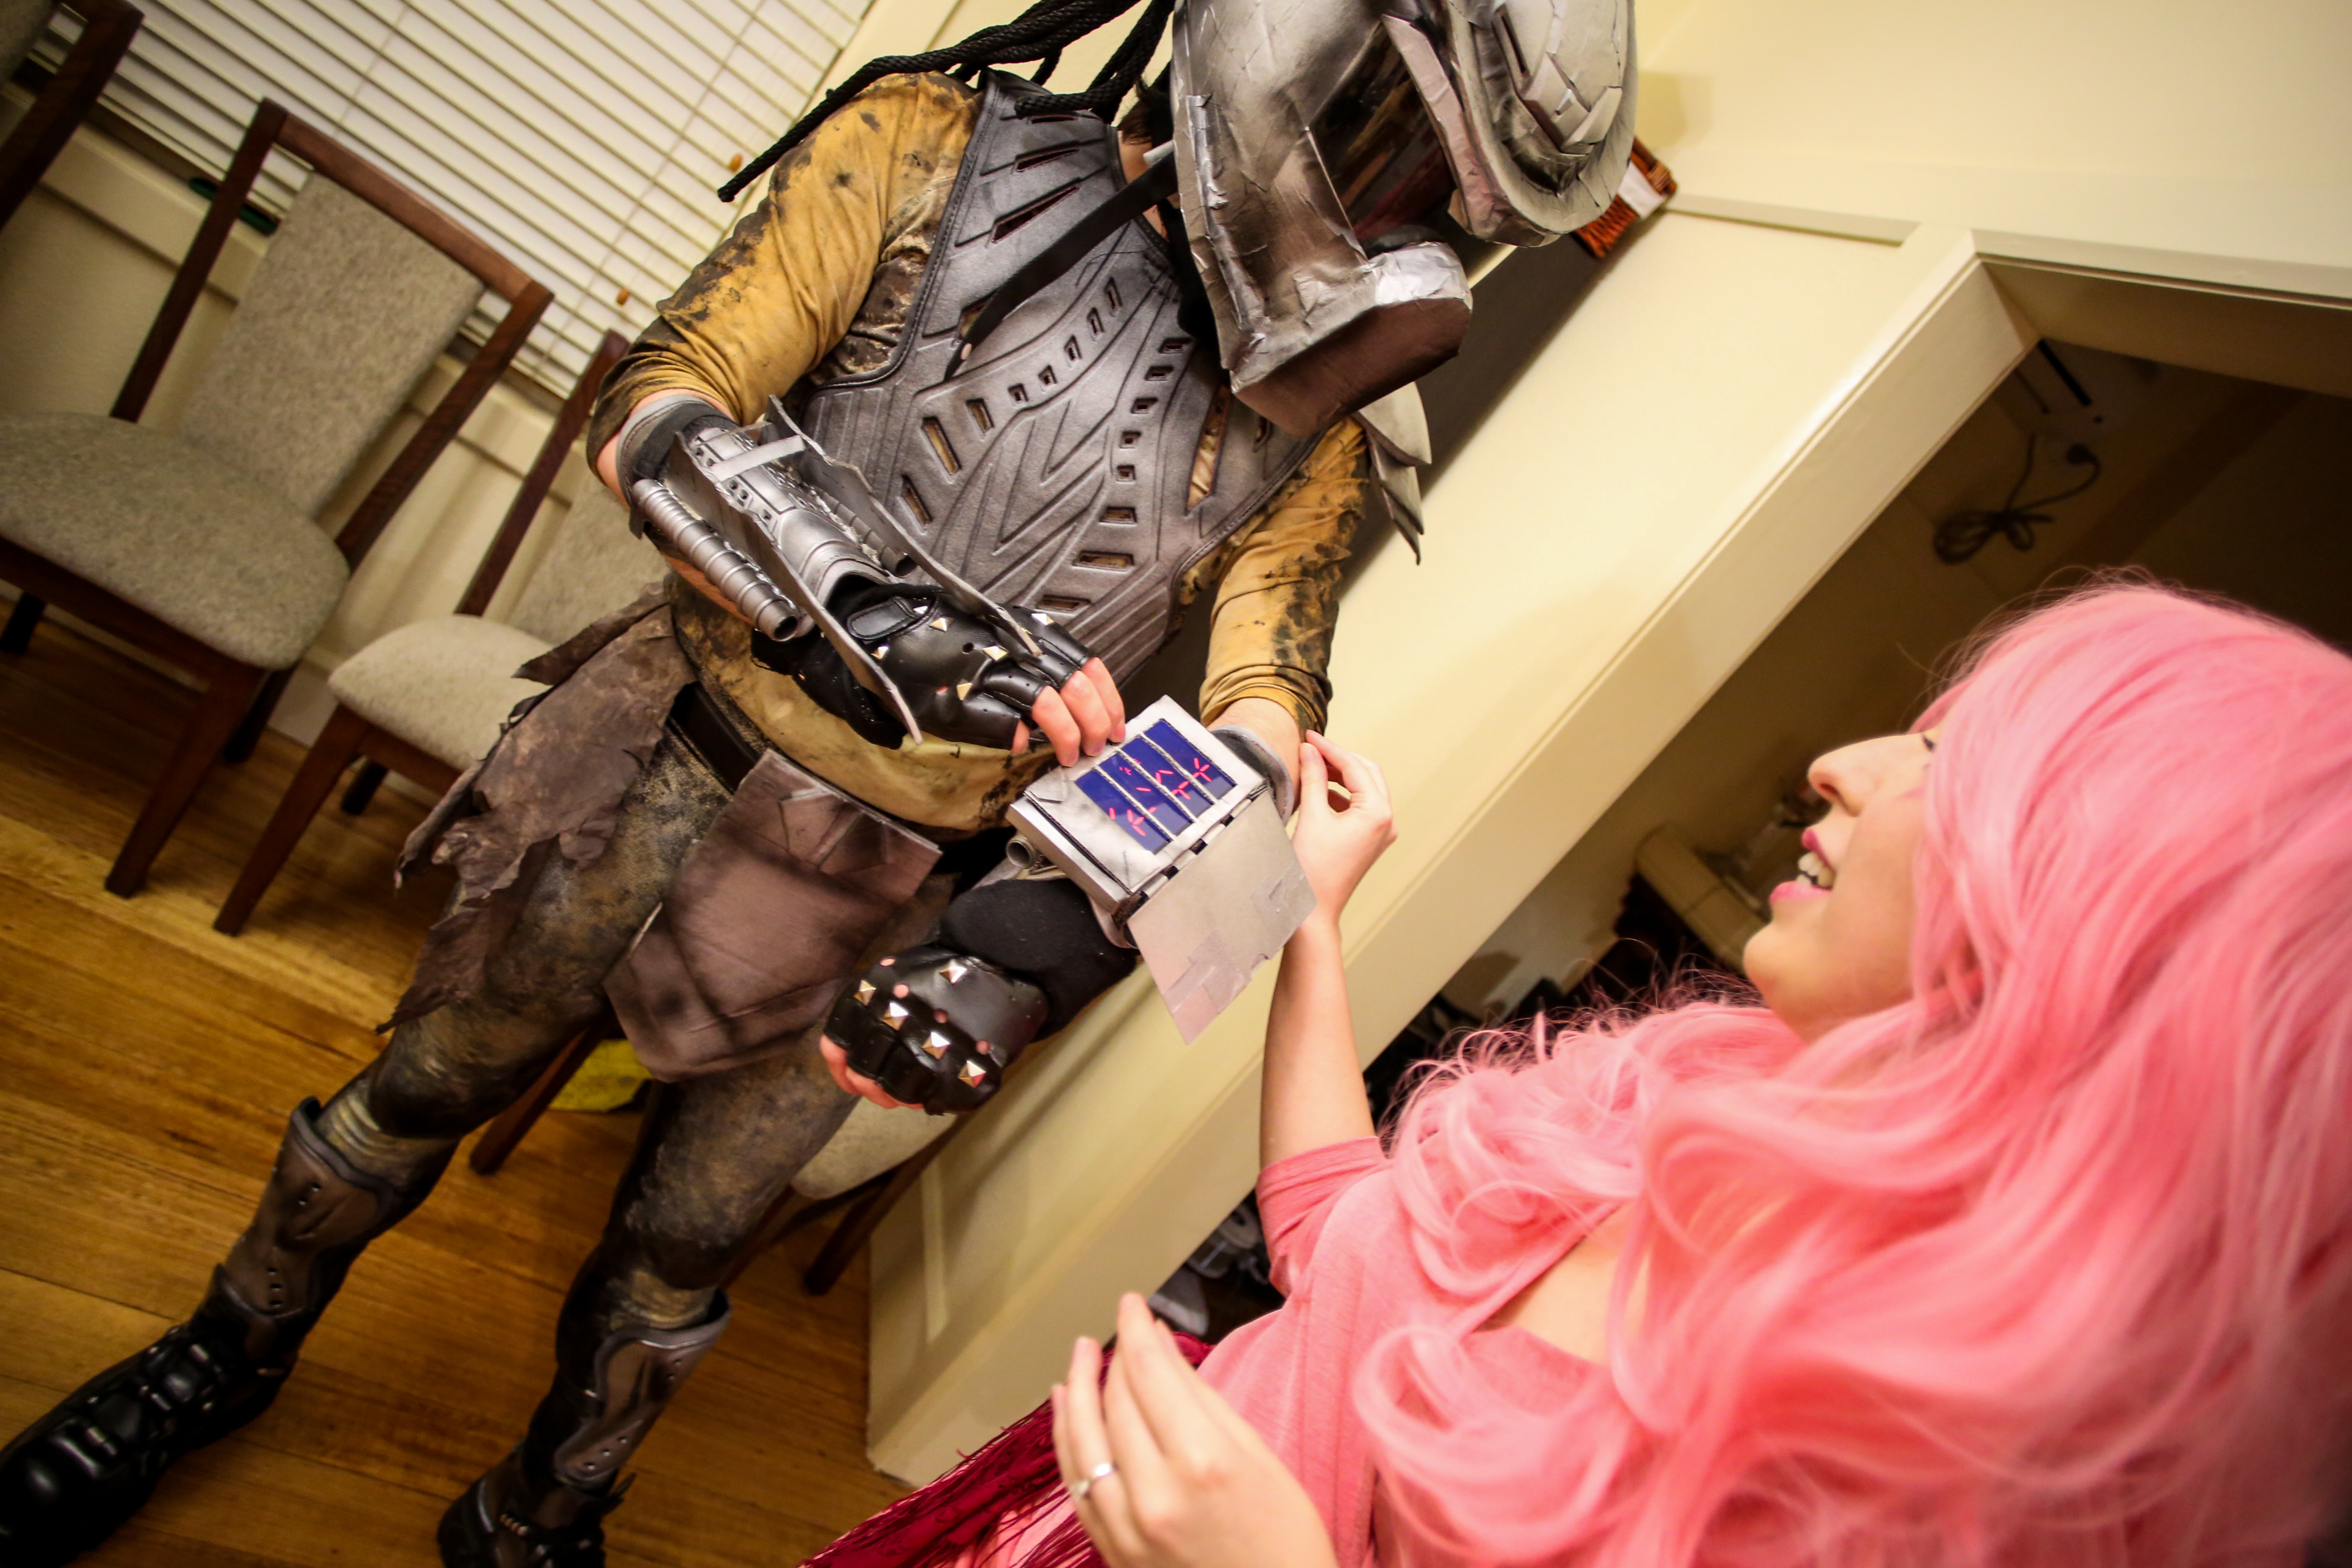
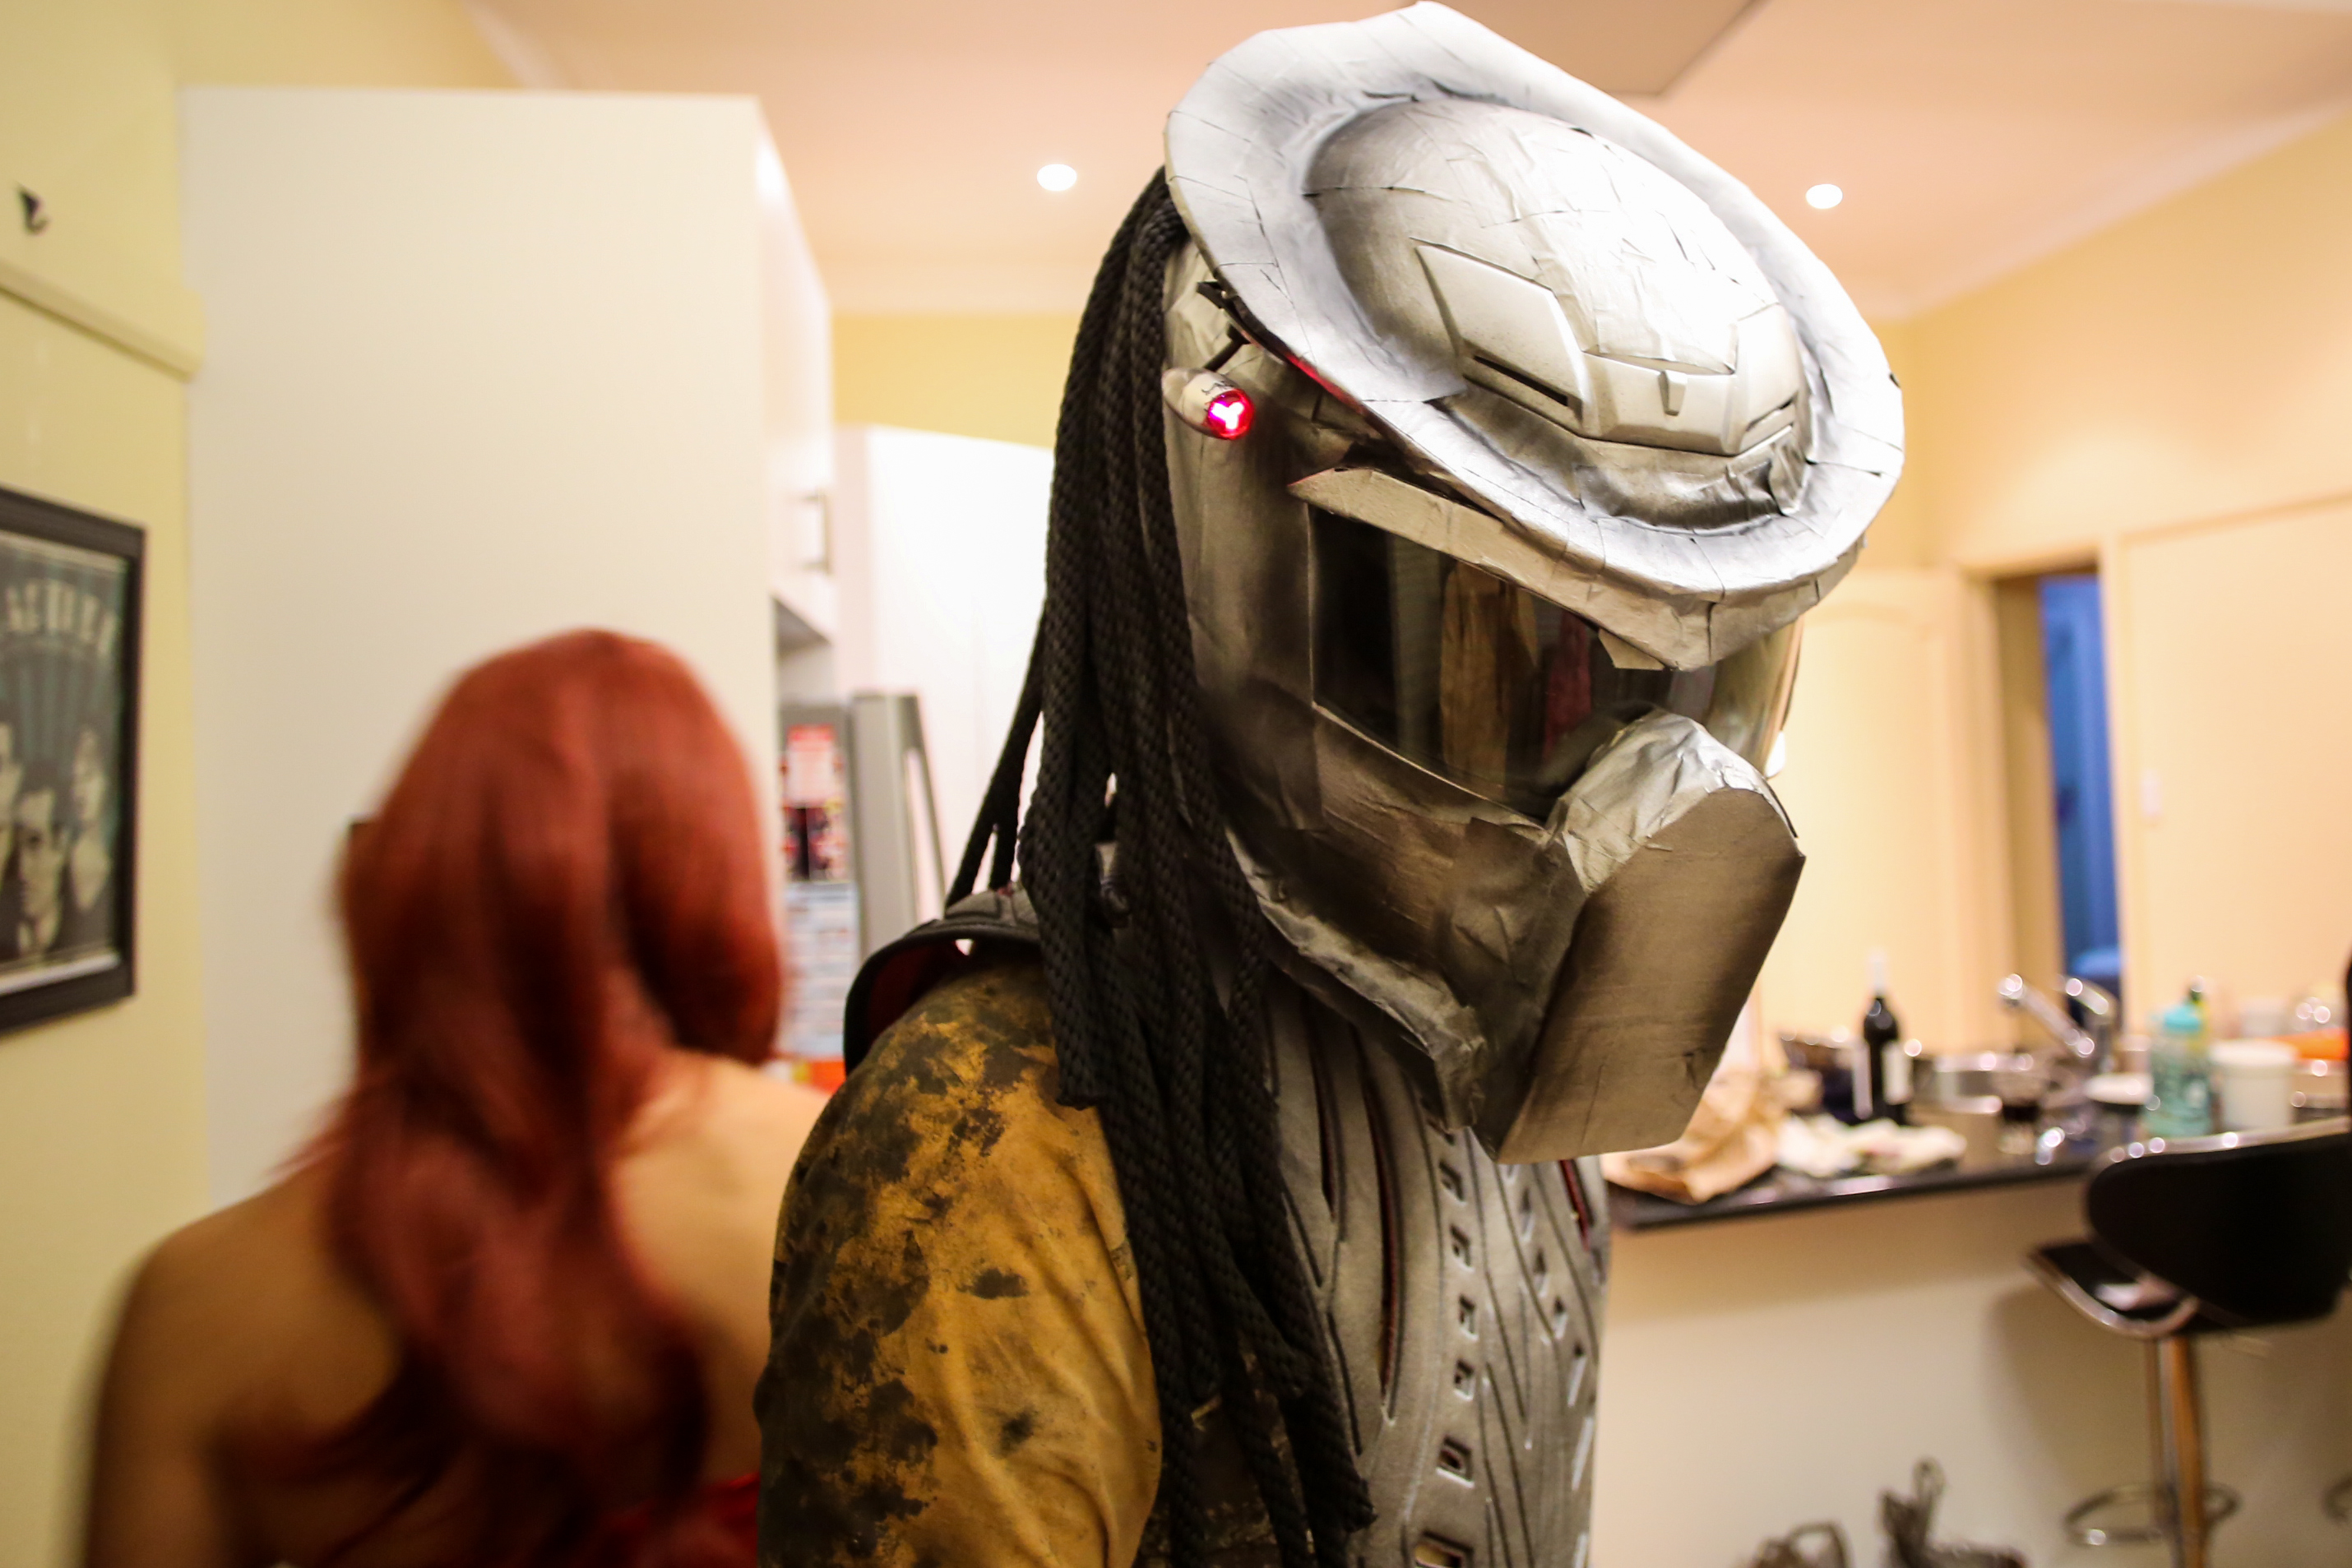
The finished product. Pay no attention to the Jessica Rabbit.
Cost: $25-800+
Effort: 5 hours.
Skin
This took hours. Like, five, or more. Thankfully, it wasn’t my time. When it comes to arty stuff, I just lack talent. Okay, so perhaps I should refine that, considering the juxtaposition of this post, on this blog, on which I am creating “art” of a sort with words, while describing how I creatively put together a costume.
Firstly, I didn’t make this design up. I used pictures as various references, a small stretch of imagination to replace bits I thought were too hard or time consuming, secondly, I guess I mean “fine art”. I’m hopeless at drawing, painting, sculpting, working with clay, wood or metal. So the paint job on the skin would literally have been impossible for me to do. All credit here goes to my fiancee, who IS artistically talented.
The legs are women’s leggings, with a textured kind of lizard/reptile skin pattern that’s really only noticeable up close, especially in the black bits. The top is just some white/grey/green thing I found somewhere. The paints are acrylic, and were mixed into the various colours you see here. The graduated colouring and patterns were all envisaged (again) by my fiancee. She used paint brushes and sponges for the effect, and, wow.
The tattered bits of rag which I hung from my belt to cover my butt are just cut up bits of old bedsheets. We already had most of the painting materials, but we bought a couple of colours and a sponge.
![IMG_20140523_151335[1]](https://accurateobservation.com/wp-content/uploads/2014/07/img_20140523_1513351.jpg?w=497&h=662)
Cost: $30
Effort: 5 hours, drying overnight.
Hiding My Face
This was tough. With a little foresight I might have done things a little differently here. The problem I needed to overcome was the helmet visor was clear, meaning you would see my distinctly human face, ruining the Predatorial illustion.

This is the effect I needed to avoid. Also, handy tip to Predators out there: you can’t eat through your helmet.
I tried pulling a tshirt over my face and putting the helmet on, this worked, but it was very hard to see out of. I thought maybe some self-applying window tint or contact might work, but I should have done this BEFORE making the helmet, which I had not, any attempt now would be futile, almost impossible to work inside or outside the helmet, and would undoubtedly bubble and look terrible.
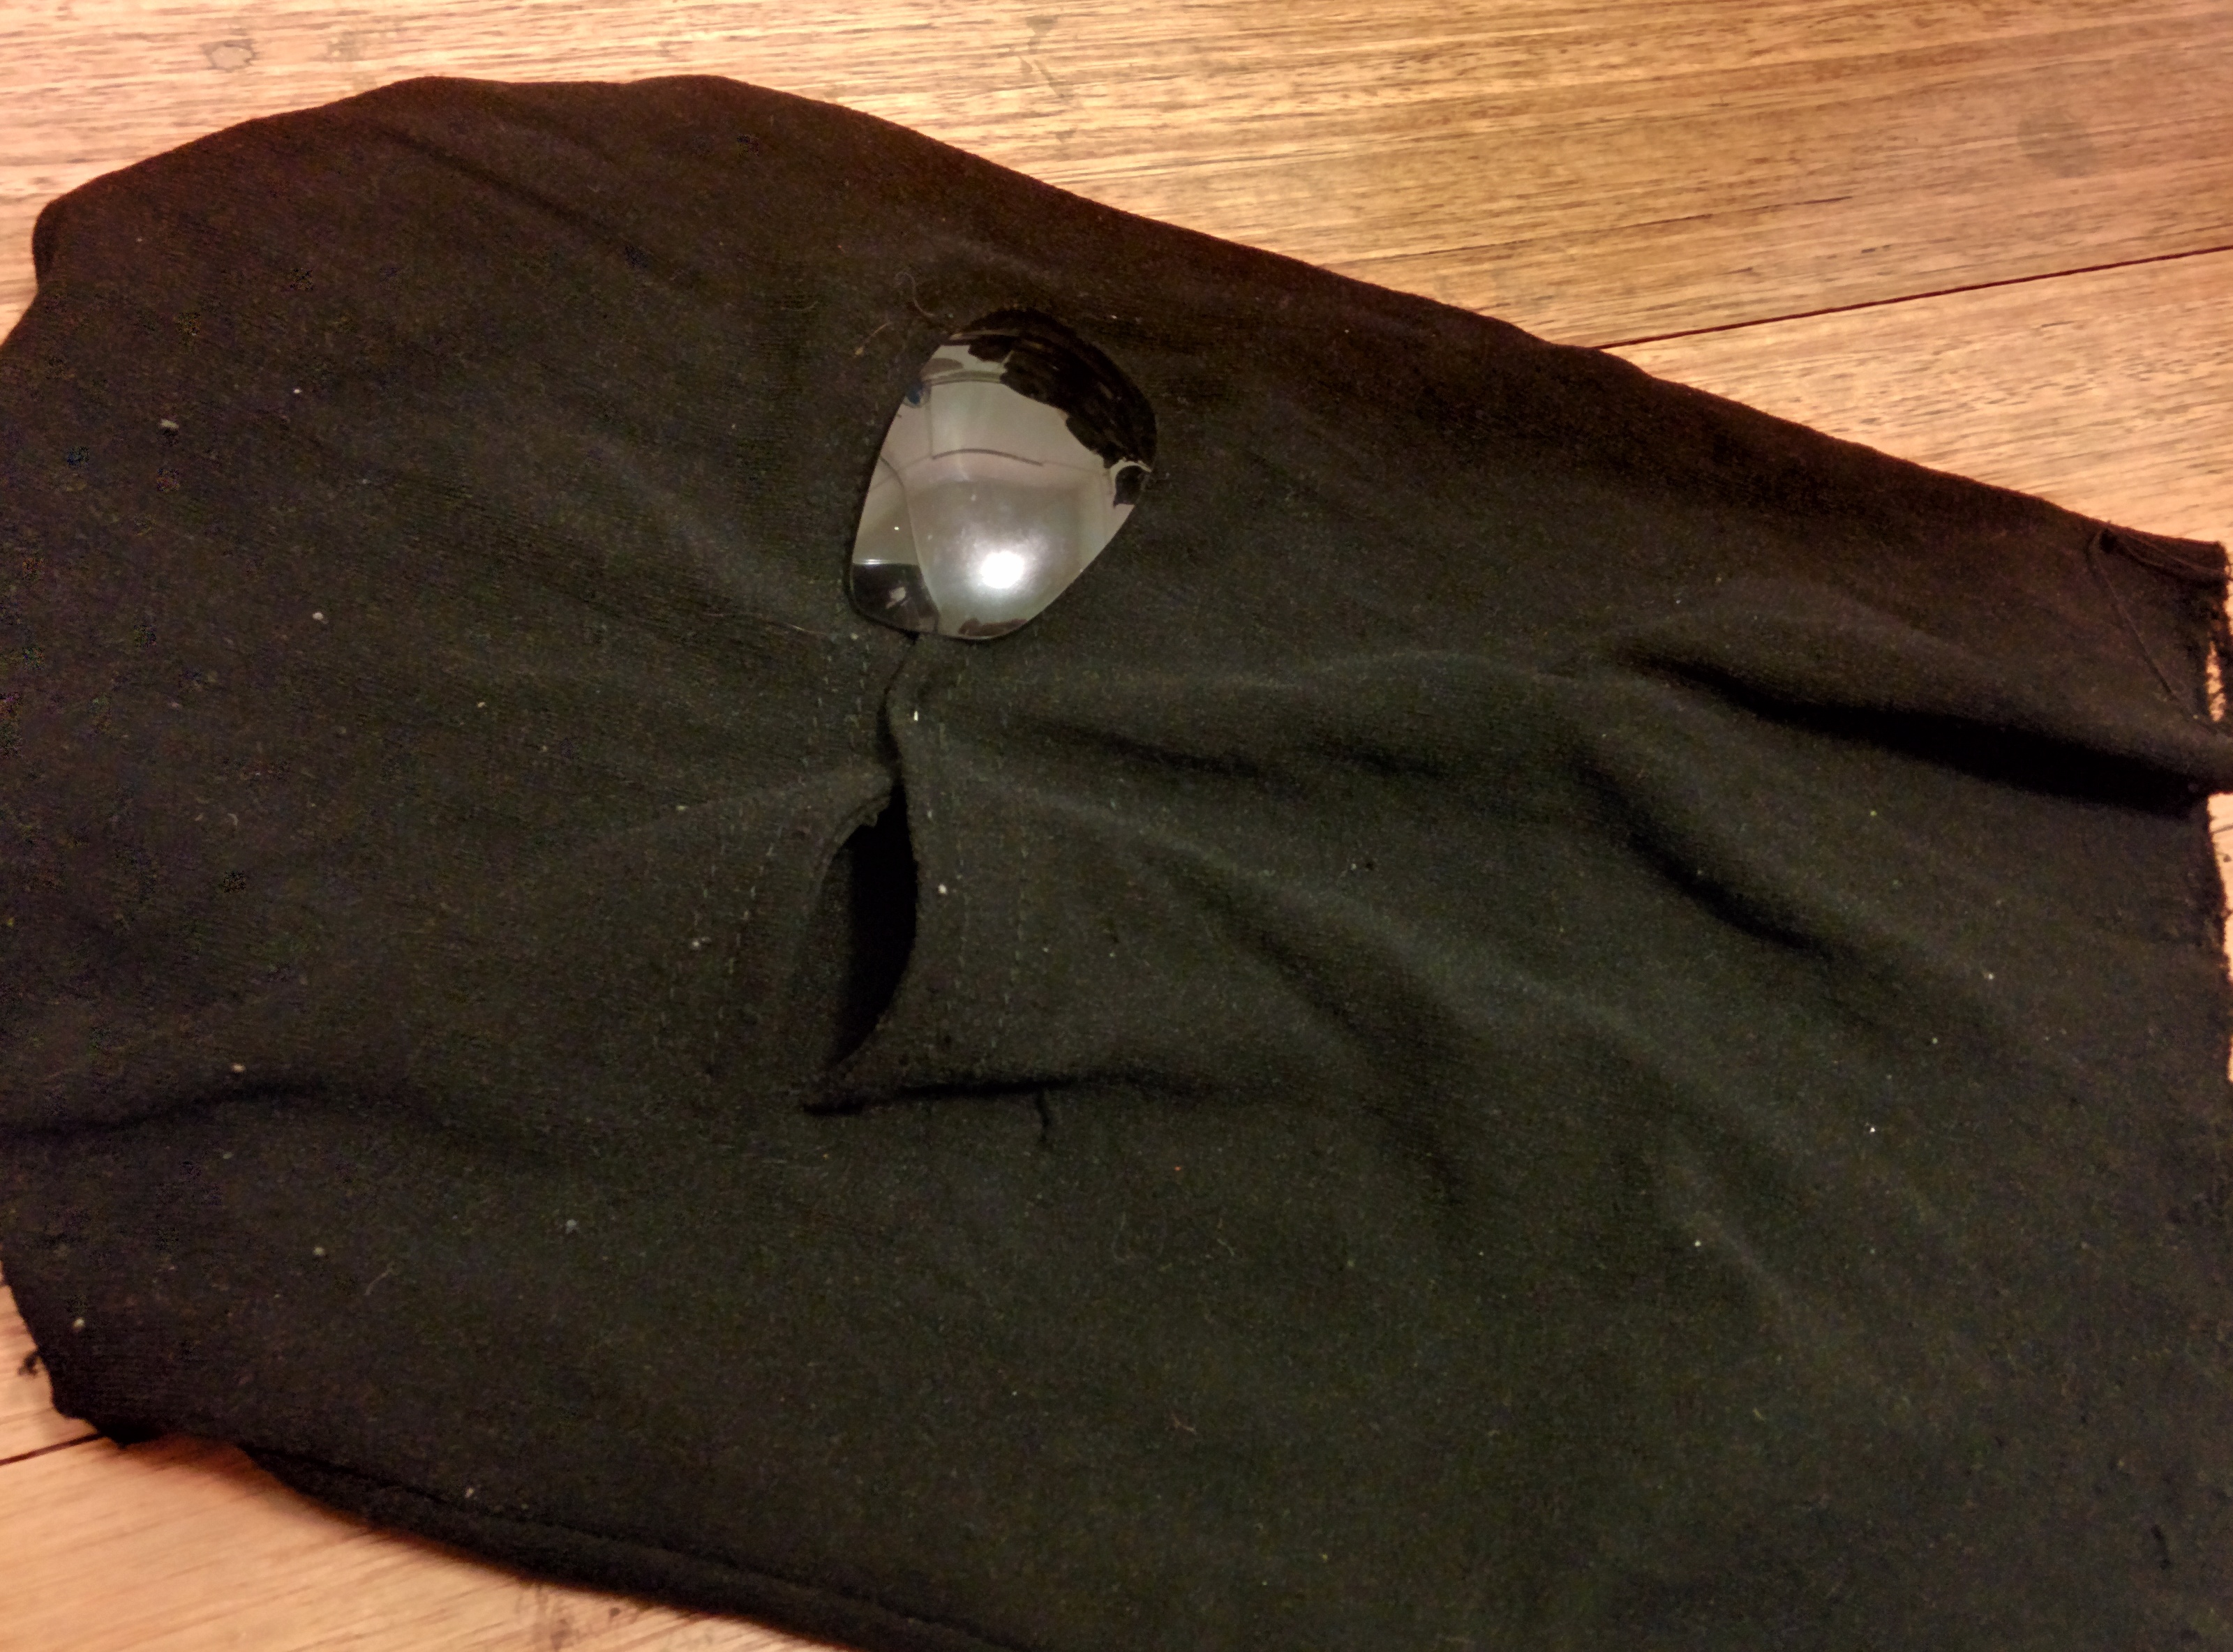
Actual tinted/iridium visors would work, but these are expensive – in the realm of $80, and again I would have needed to have done this BEFORE making the helmet. It was looking like the t-shirt was the best option. Then it was suggested to me to use my ninjutsu hood. A safety pin would pinch the bridge of the nose bit closed and I could make-up around my eyes to blacken any visible skin/eyelids etc.
And THEN I remembered that I had a couple of sunglasses lenses I’d hung onto from a pair of broken sunglasses. I was actually thinking I might use them for an Adam Jensen cosplay attempt at some point (maybe I still will), but I knew they fit around my eyes pretty well – I can hold them in there with no support from anything, but moving my face means they fall – so with the ninjustsu mask to hold them, it just might work. And it did. Face completely invisible under the helmet. The only issue was the lenses would fog with all of the breathing I would do.

Ninja mask with one sunglass(?) lens
Cost: 0
Effort: 10mins
Accessorise
Miscellaneous things I used on almost all components in this build were:
Cardboard: $0 (boxes from package deliveries)
Masking tape: $5
Spray paint, silver/black: $20
Hot glue gun: $100
Glue: $10
Stanley knife: Already owned, I don’t recall how much it was, but it’s fairly industrial.
Total cost: $230 (thanks to owning a lot of expensive parts, but budget replacements could be made with a
little extra effort)
Total work time: ~18 hours, and a few days of drying.
Things I’d do Differently
Better scissors. I literally got a blister on my fingers from using crappy scissors.
Give myself more time. I could have made things – especially the helmet – so much better but I procrastinated starting the project.
I though getting some glow-in-the-dark paint (or one of those squeezy pens, if they still exist) would have been cool for replicating Predator blood, but didn’t have the time or energy to find it.
So there you have it. A budget predator costume that looks pretty darn good, if I do say so myself.
Normally I might sign off an article like this with a Predator quote, but he doesn’t really say much that’s quotable, and I don’t know how to type that mandible chattering noise, so I guess this will write up will just fizzle to an end. Thanks for reading.

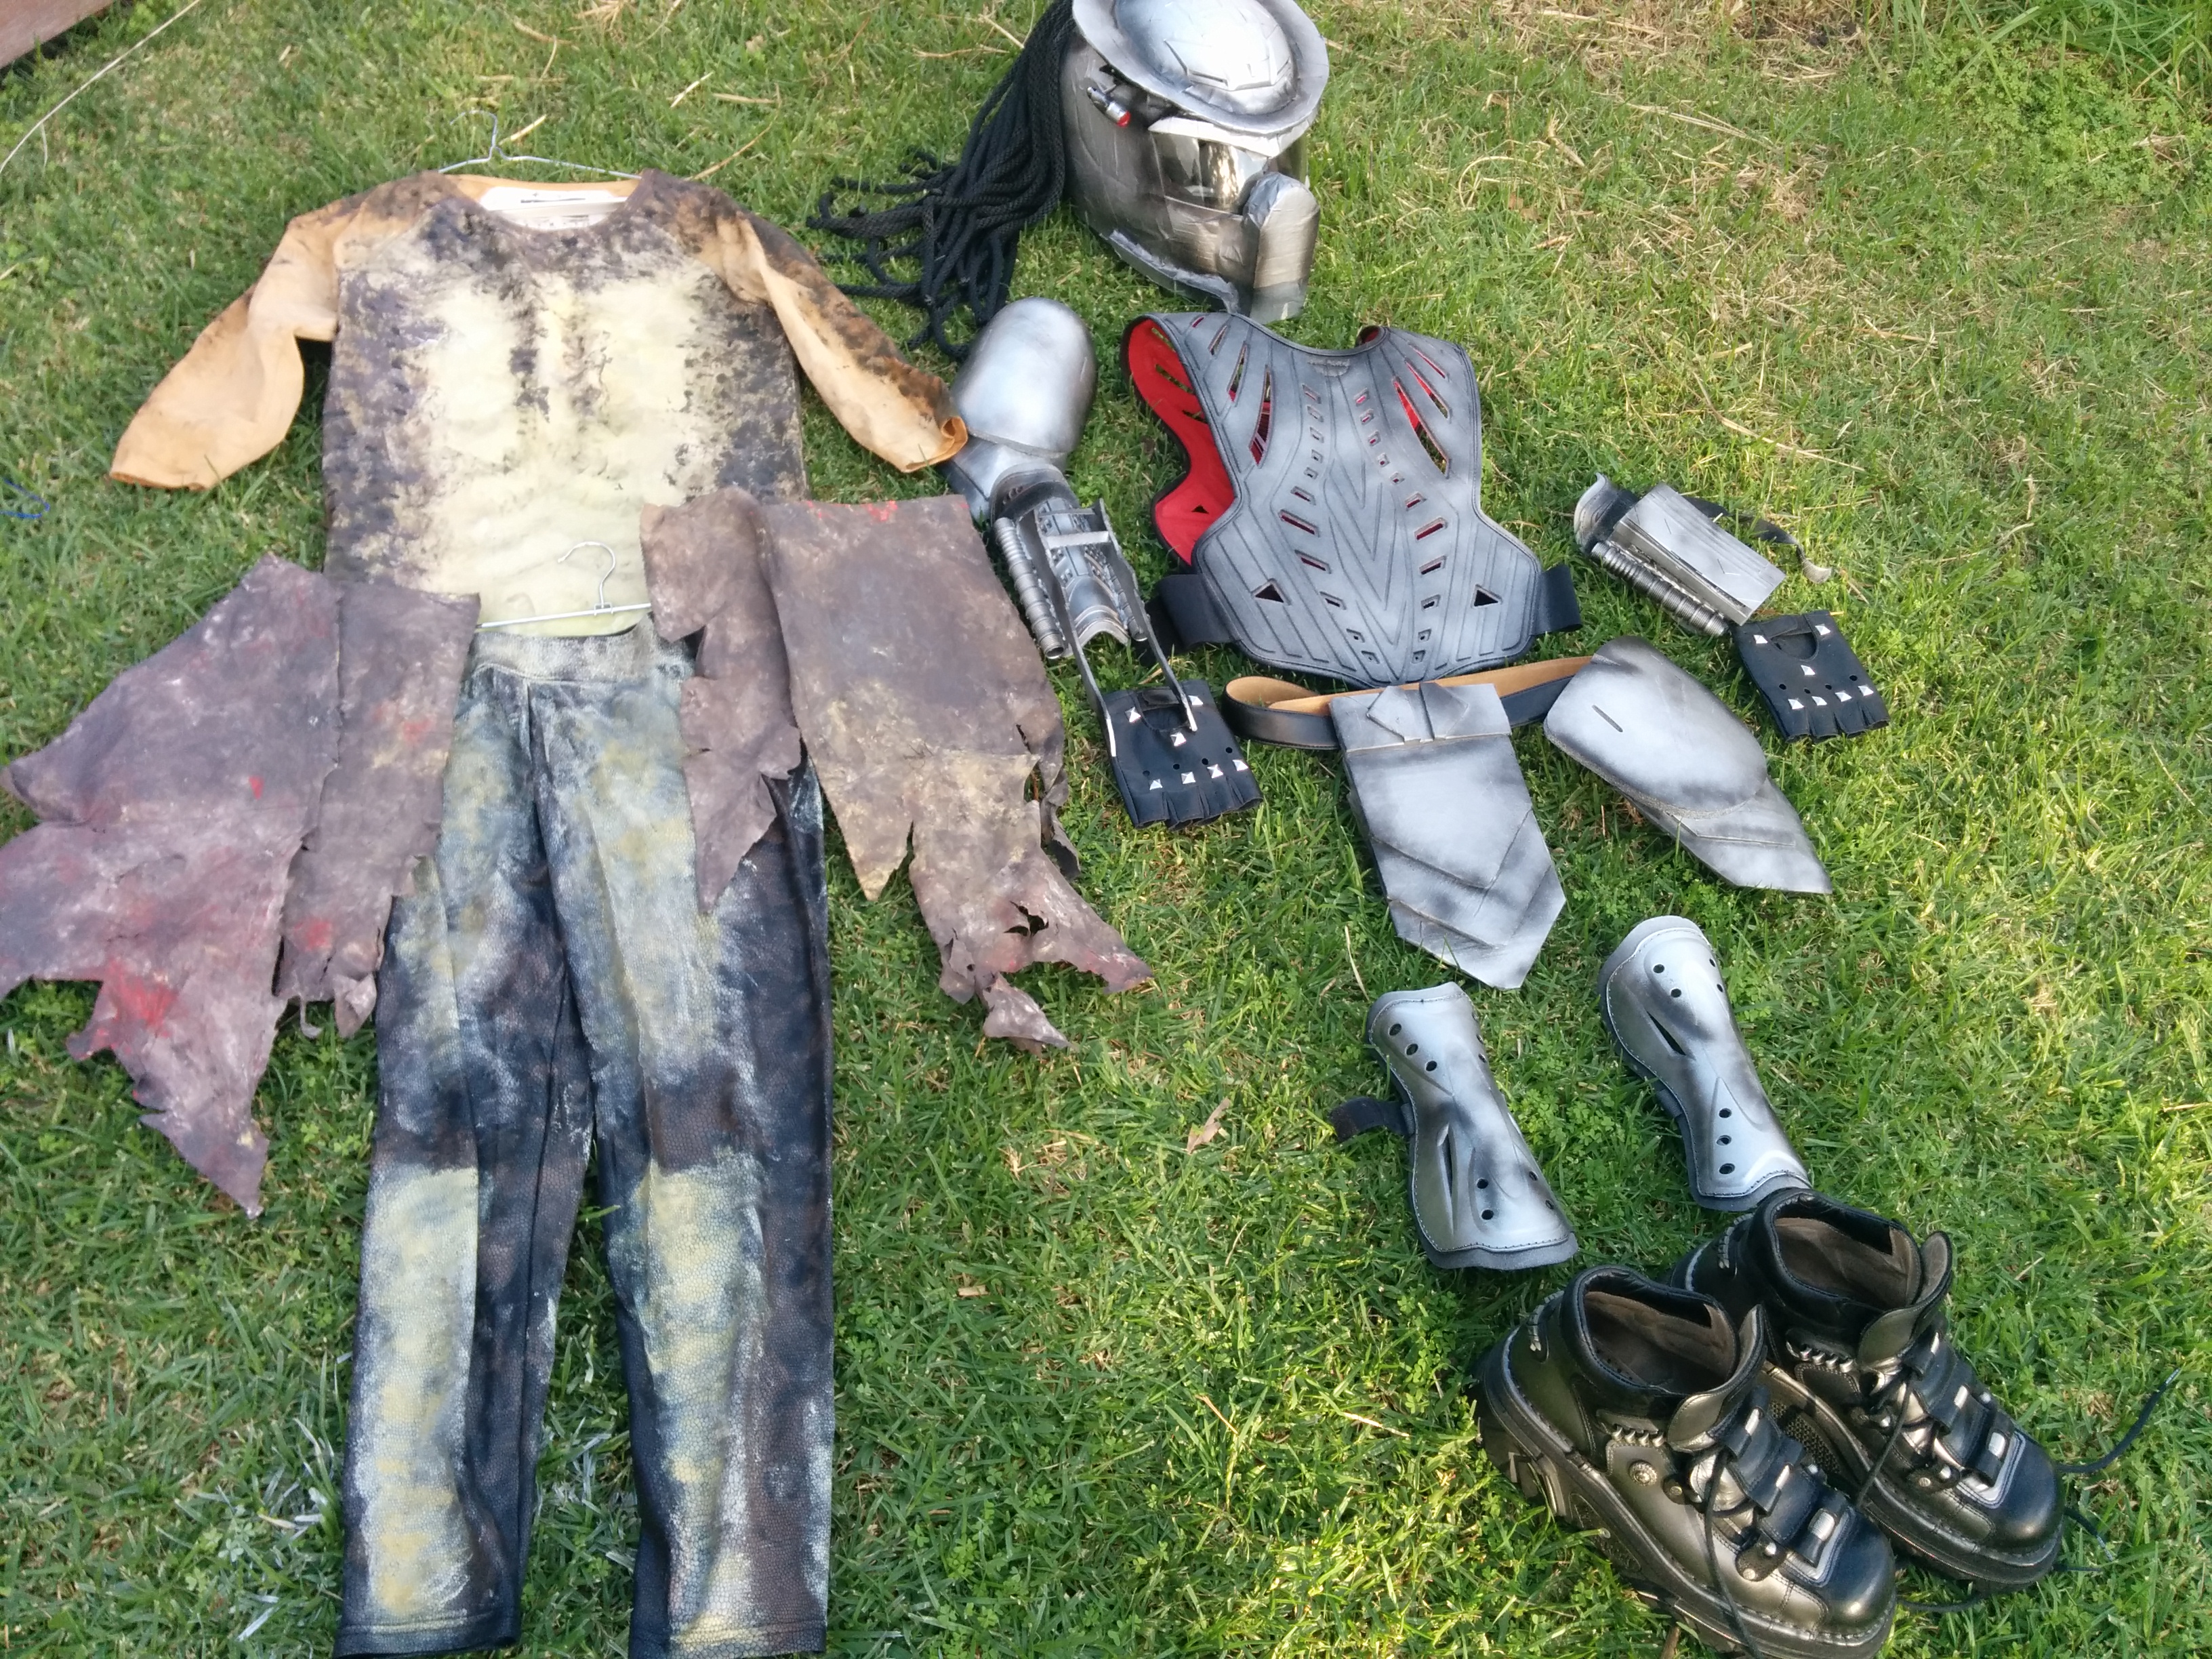
The full costume, ready to be worn

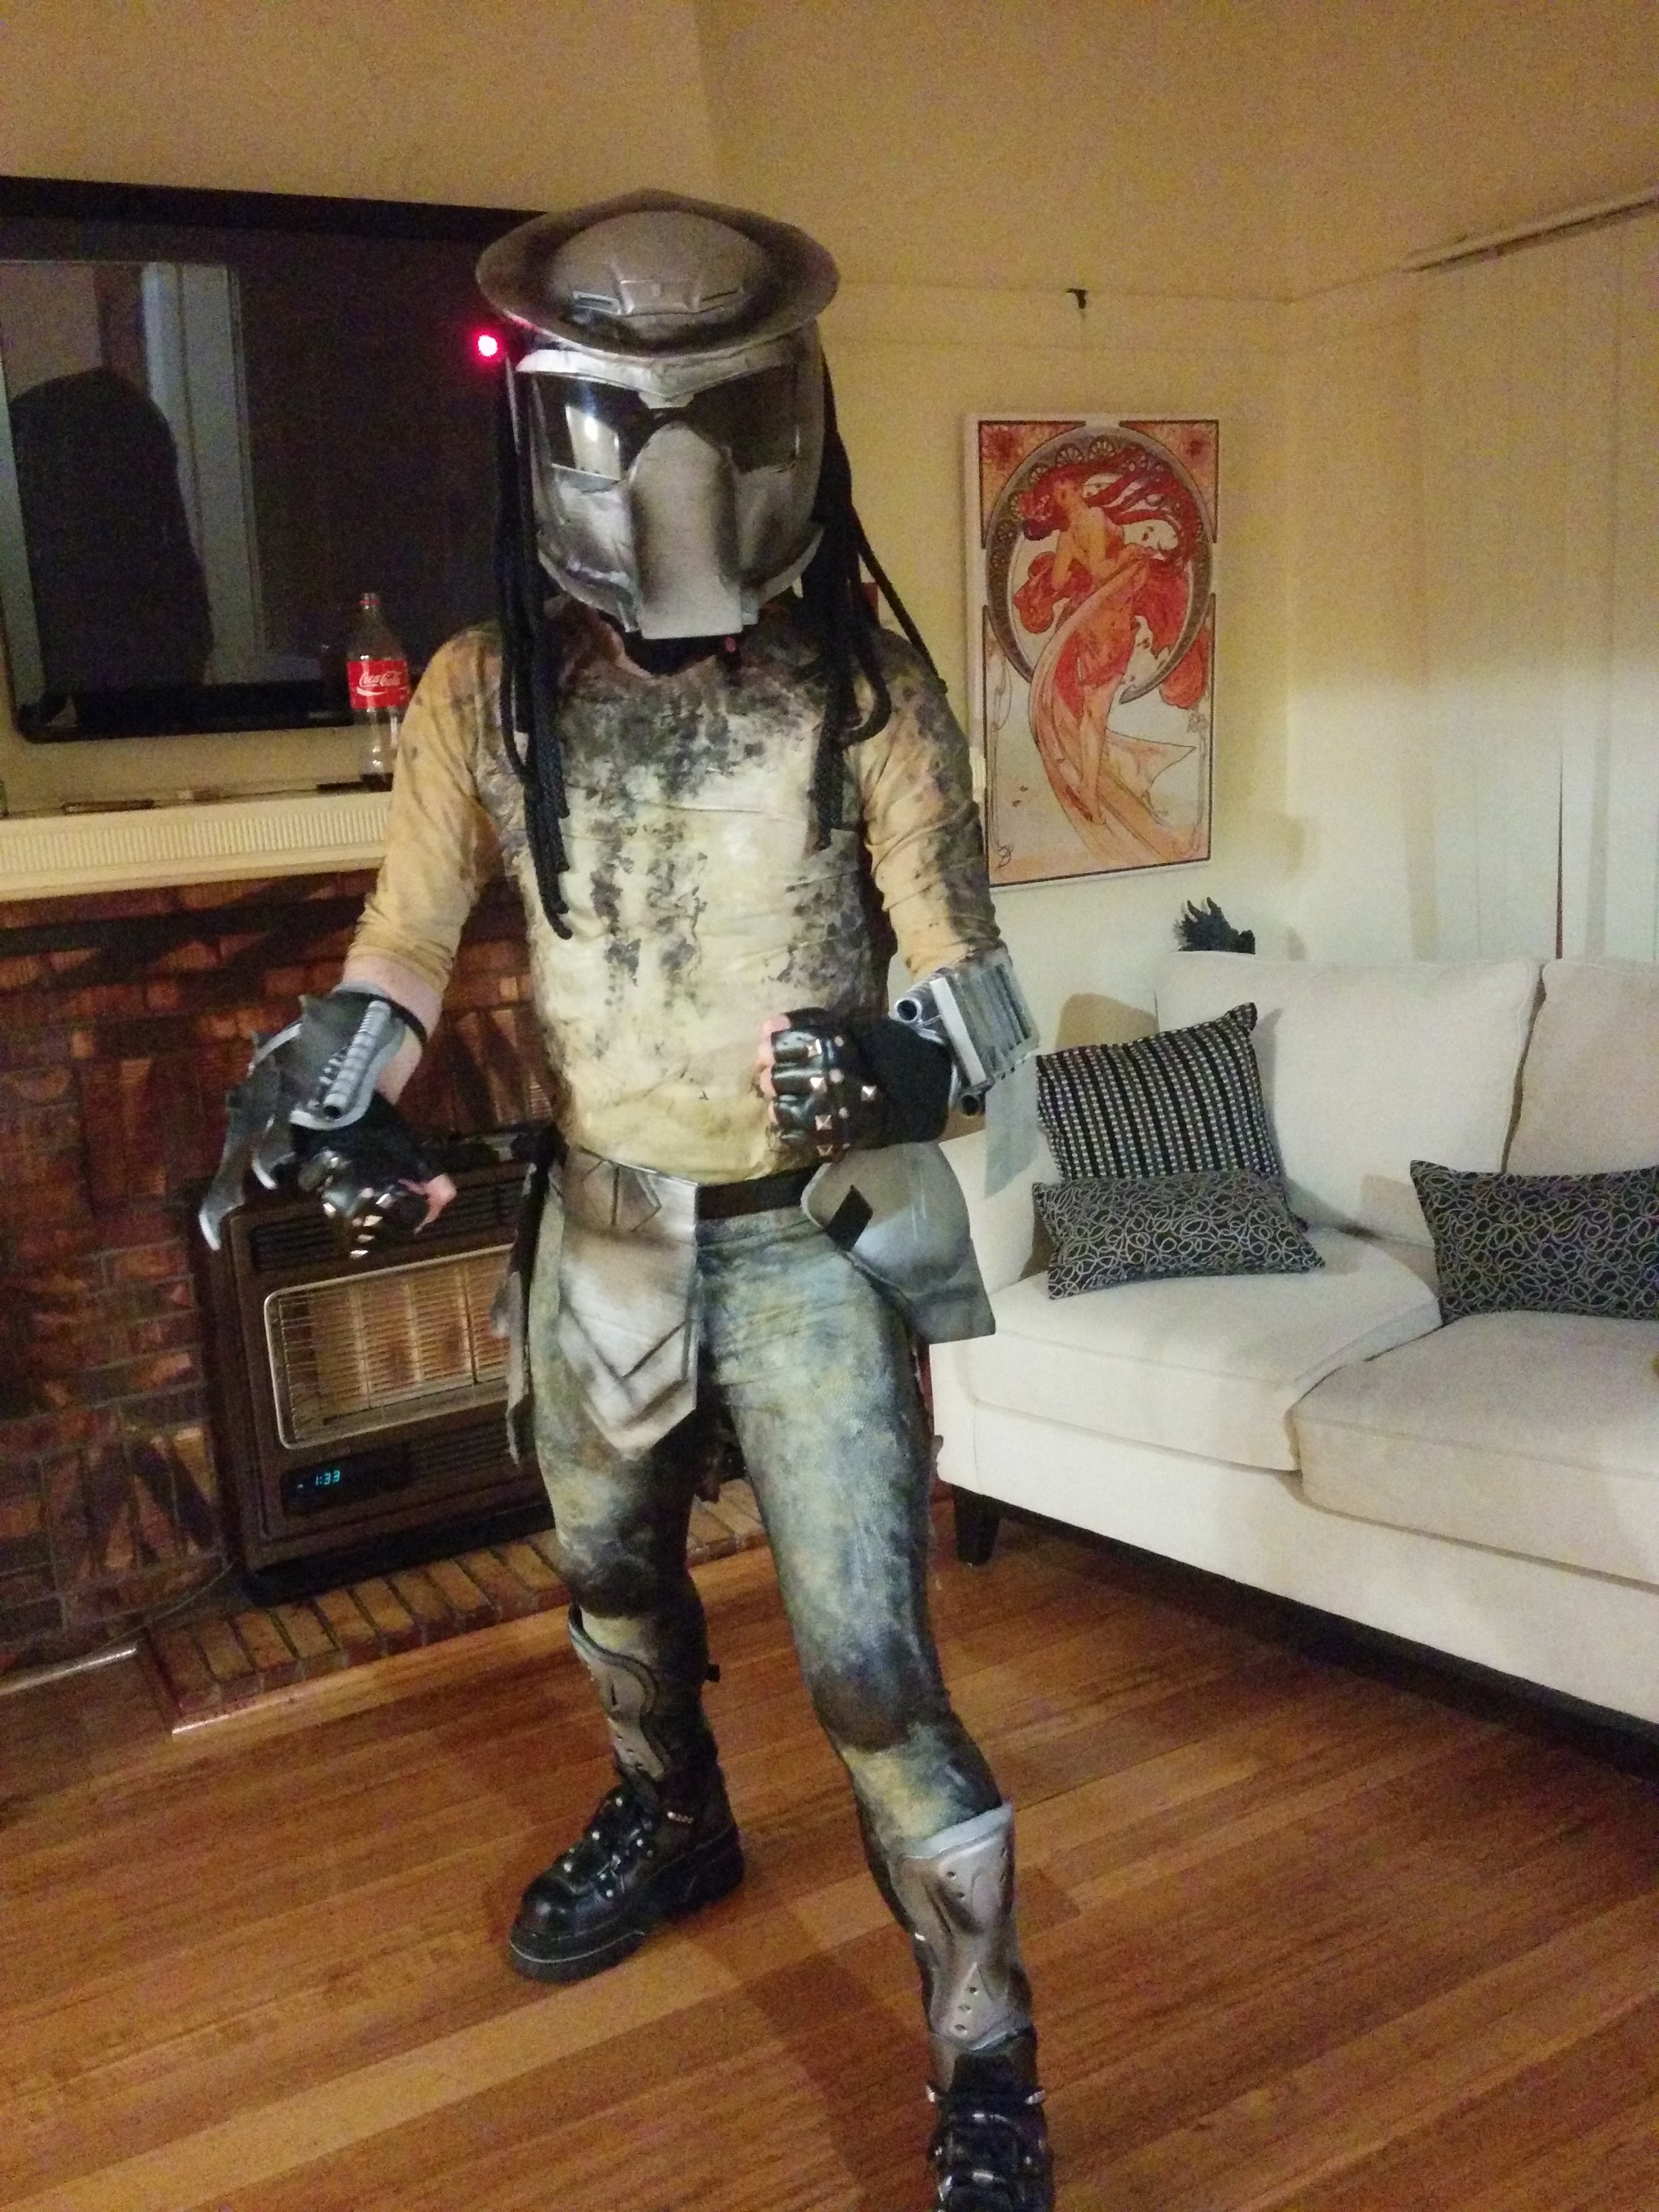
No chest piece

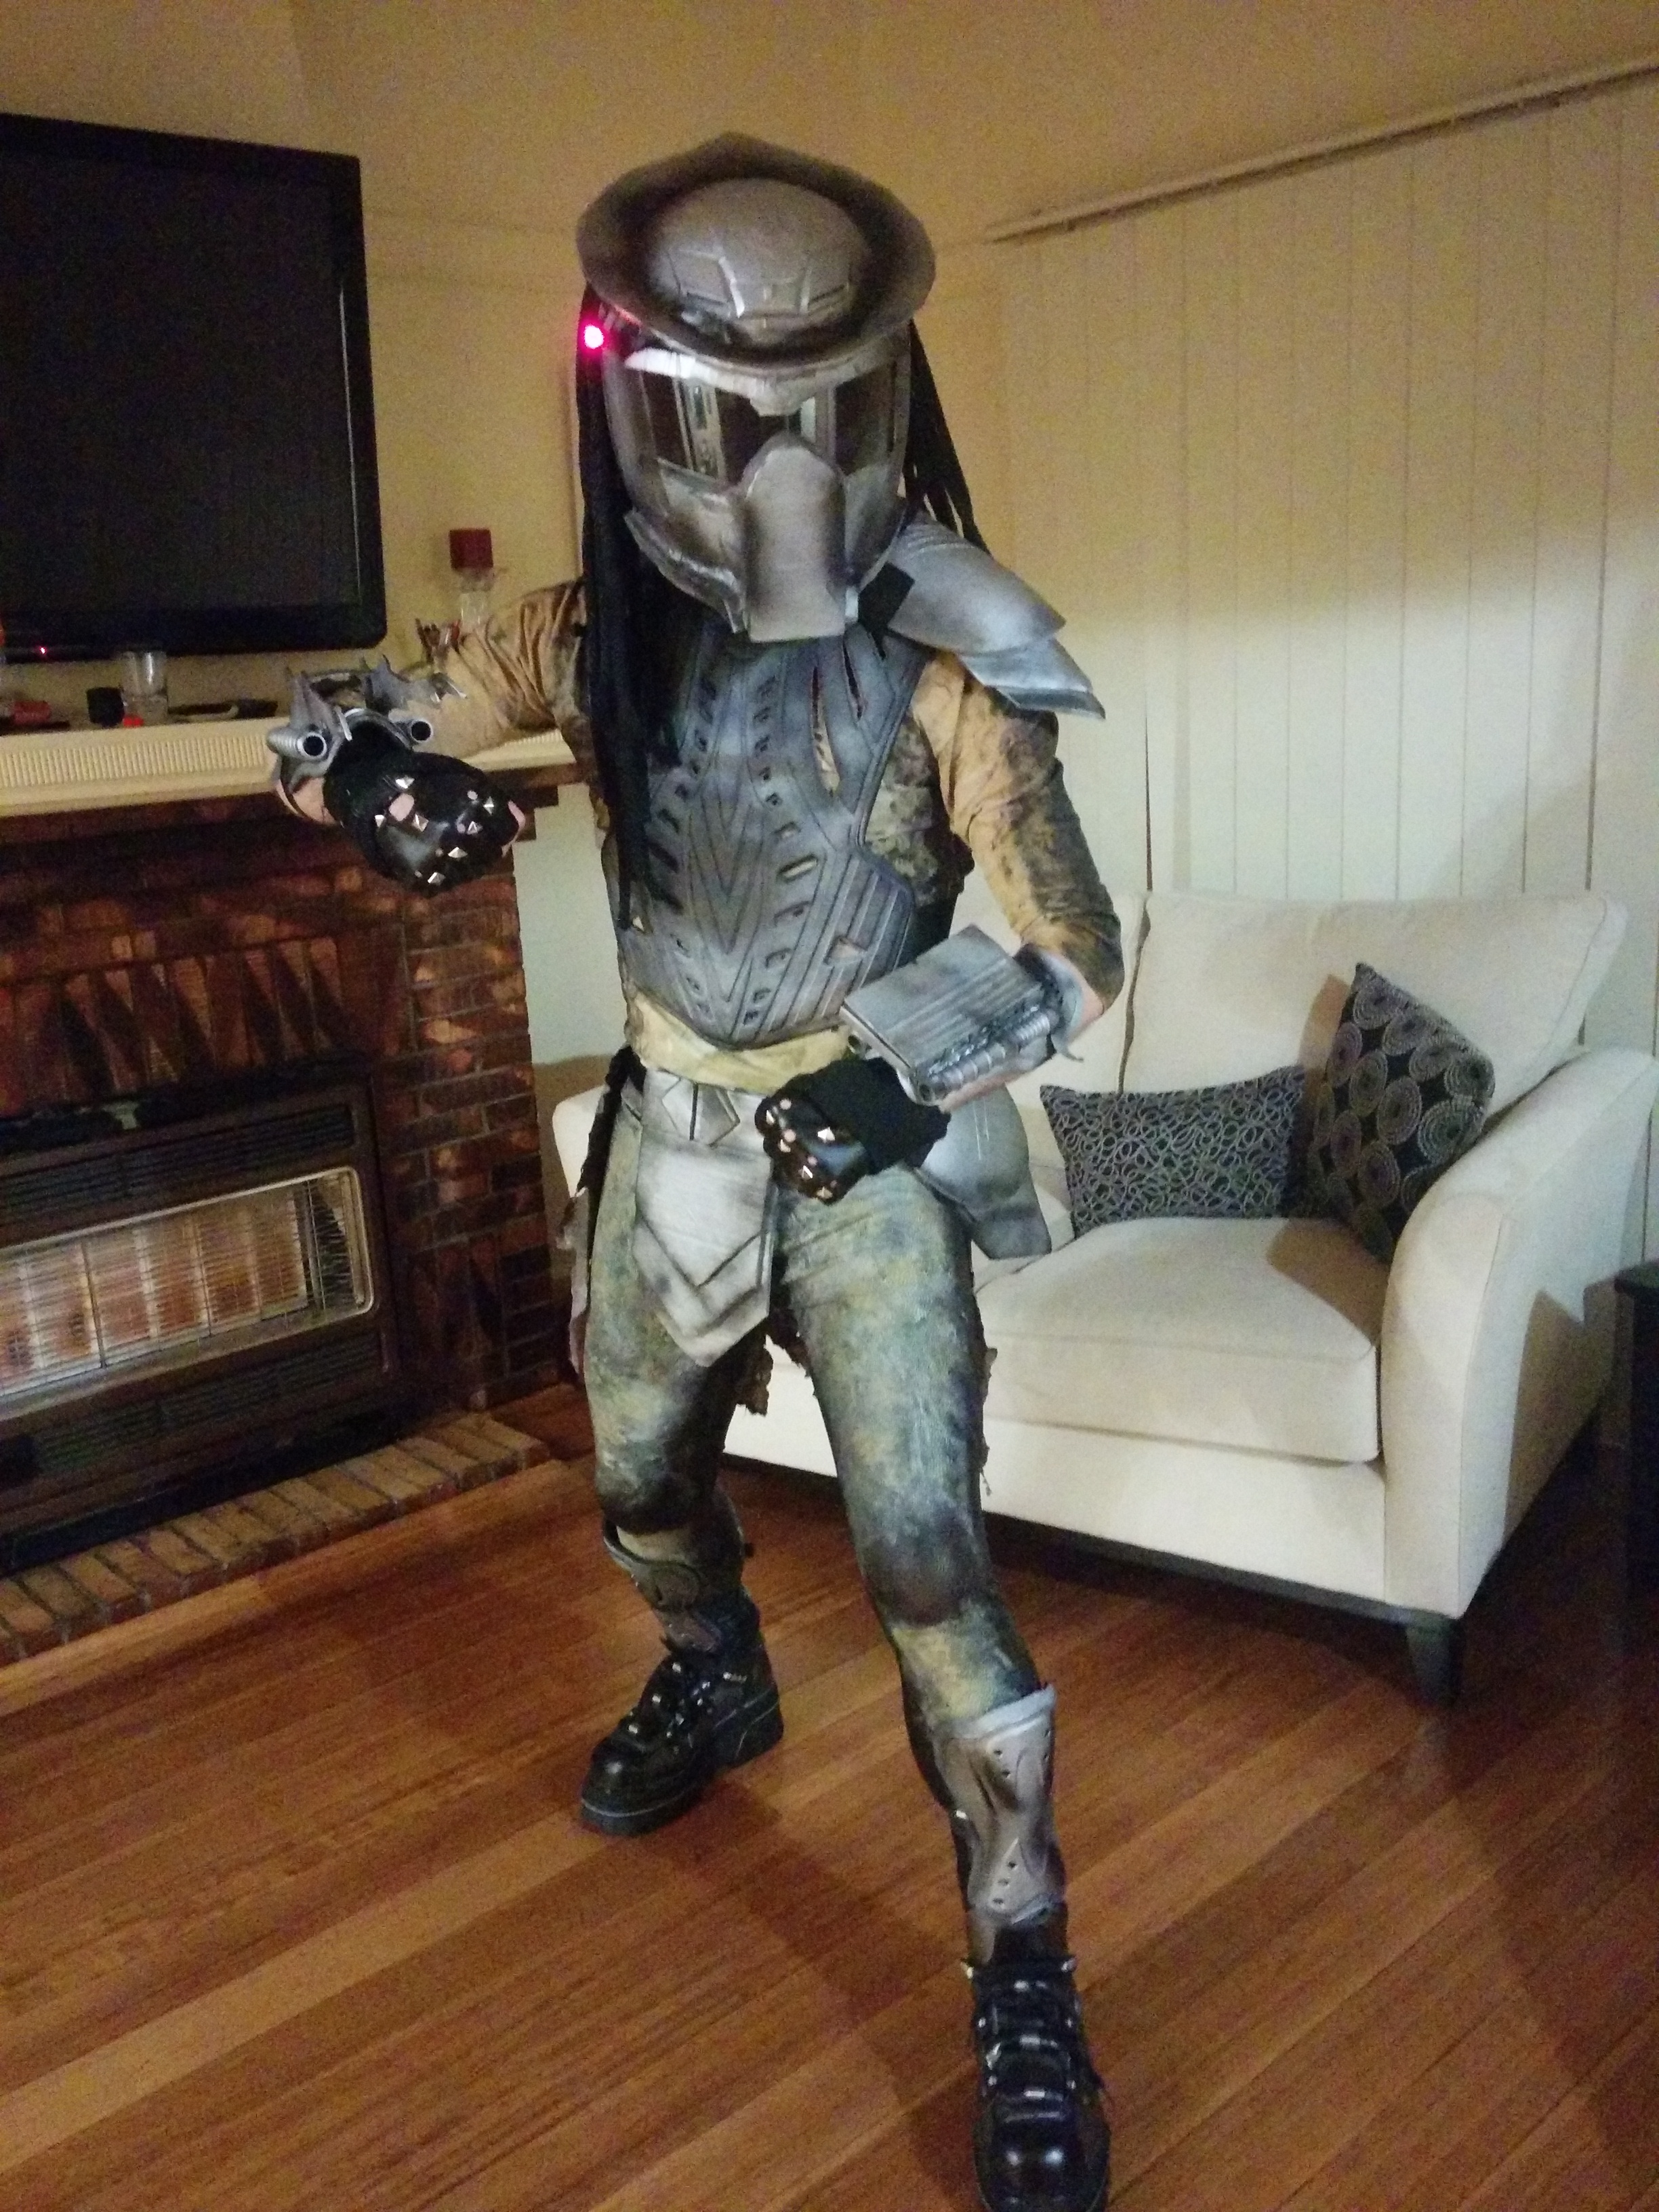
With chest piece

Trivia: The Predator is engaged to Jem. Truly outrageous.
Posted in Uncategorized


![IMG_20140705_182538[1]](https://accurateobservation.com/wp-content/uploads/2014/07/img_20140705_1825381.jpg)

![IMG_20140518_144901[1]](https://accurateobservation.com/wp-content/uploads/2014/07/img_20140518_1449011.jpg)
![IMG_20140517_213911[1]](https://accurateobservation.com/wp-content/uploads/2014/07/img_20140517_2139111.jpg)
![IMG_20140517_220416[1]](https://accurateobservation.com/wp-content/uploads/2014/07/img_20140517_2204161.jpg)
![IMG_20140517_233913[1]](https://accurateobservation.com/wp-content/uploads/2014/07/img_20140517_2339131.jpg)
![IMG_20140517_233926[1]](https://accurateobservation.com/wp-content/uploads/2014/07/img_20140517_2339261.jpg)
![IMG_20140518_024913[1]](https://accurateobservation.com/wp-content/uploads/2014/07/img_20140518_0249131.jpg)
![IMG_20140518_024933[1]](https://accurateobservation.com/wp-content/uploads/2014/07/img_20140518_0249331.jpg)
![IMG_20140523_151335[1]](https://accurateobservation.com/wp-content/uploads/2014/07/img_20140523_1513351.jpg)